Last year we decided to move Veryfi’s Python-based web app onto Microsoft Azure. The process was complicated and involved several stages. First I had to Dockerize the app, then move it into a Docker Swarm setup, and finally set up a CI/CD pipeline using Jenkins and BitBucket. Most of this was new to me, so the learning curve was steep. I had limited experience with Python and knew of Docker and Jenkins, but had yet to dive into the deep end. After completing the task, I thought I could share my research and process.
I’ve compiled a three-part series that will cover these topics:
- Dockerizing a web app, using Docker Compose for orchestrating multi-container infrastructure
- Deploying to Docker Swarm on Microsoft Azure
- Creating a Continuous Deployment pipeline with BitBucket, Jenkins and Azure
This is the third and last post in the series, where I'll discuss the process of setting up a Jenkins build server, configuring BitBucket and then creating a fully functional pipeline that builds the appropriate Docker images after a BitBucket push and deploys the build to a Docker Swarm running on Microsoft Azure.
Make sure to read my first two posts (links above) so we’re on the same page because I’ll be building off those. The first two posts focus on the steps required to migrate an app to a Docker environment, setting up a Docker Swarm cluster on Azure then deploying to that cluster manually. This post will cover the automation side of deployments.
Note: I've included resource files related to this post here.
The example app that I'm deploying here is the same, minimal "Hello World" app that I used in the first two posts. See this repo for reference.
Why we implemented Continuous Deployment at Veryfi
Our manual deployment process was tedious and time-consuming. As a result, code that was ready to be shipped would stay on the back burner for hours or even days, because it simply took up too many resources to deploy. We actually found ourselves in a similar situation as many of Veryfi’s own customers, only instead of an expense management solution we needed a better deployment process. We now deploy multiple times a day with minimal impact on other essential daily activities. What used to take up to a half hour now happens with a couple of clicks and typically less than a minute of "mental distraction."
Setting up Azure Container Registry
Before we get to Jenkins, we need a few prerequisites in place. In the second post of this series, we set up a Docker Swarm cluster on Azure. Now we'll need to set up a Docker image registry. You could use the official Docker Hub, but in our case, we chose to use ACR (Azure Container Registry).
- In Azure portal, click "Create a resource" and search for "container registry"
- Select Azure Container Registry by Microsoft:

- Follow the prompts to finish creating the ACR
Set up a Service Principal Name for Azure
Next we'll need to set up a Service Principal Name (SPN) that will be used by Jenkins to connect to ACR. Because I use a Mac for all my work, all instructions are Mac-specific.
- Install Azure CLI 2.0:
# Ref: https://azure.github.io/projects/clis/
$ curl -L https://aka.ms/InstallAzureCli | bash
- Install dependencies required for step 5:
# Ref: http://macappstore.org/jq/

# Install Homebrew if you don't have it already
$ ruby -e "$(curl -fsSL https://raw.githubusercontent.com/Homebrew/install/master/install)" < /dev/null 2> /dev/null

# Install JQ (command-line JSON processor)
$ brew install jq
- Download https://github.com/abakonski/bitbucket-jenkins-acs-pipeline/blob/master/scripts/spn.sh
- Create SPN using script from step 3:
# Navigate to the path of the above downloaded script
$ cd <PATH_TO_spn.sh>

# Run it
$ ./spn.sh

# Follow the on-screen instructions and you should see the following 2 blocks within the response
# Block 1:
To sign in, use a web browser to open the page https://microsoft.com/devicelogin and enter the code XXXXXXXXX to authenticate.
[
  {
    "cloudName": "AzureCloud",
    "id": "xxxxxxxx-xxxx-xxxx-xxxx-xxxxxxxxxxxx",
    "isDefault": true,
    "name": "Microsoft Azure Sponsorship",
    "state": "Enabled",
    "tenantId": "xxxxxxxx-xxxx-xxxx-xxxx-xxxxxxxxxxxx",
    "user": {
      "name": "xxxxx@xxxxxxx.com",
      "type": "user"
    }
  }
]
Checking Azure subscription count...
You only have one subscription. Your SPN will be created in Microsoft Azure Sponsorship

# Block 2:
{
  "appId": "xxxxxxxx-xxxx-xxxx-xxxx-xxxxxxxxxxxx",
  "displayName": "myjenkins-acr-spn",
  "name": "http://myjenkins-acr-spn",
  "password": "xxxxxxxxxxxx",
  "tenant": "xxxxxxxx-xxxx-xxxx-xxxx-xxxxxxxxxxxx"
}
Successfully created Service Principal.
- Confirm that a Contributor SPN has been created:
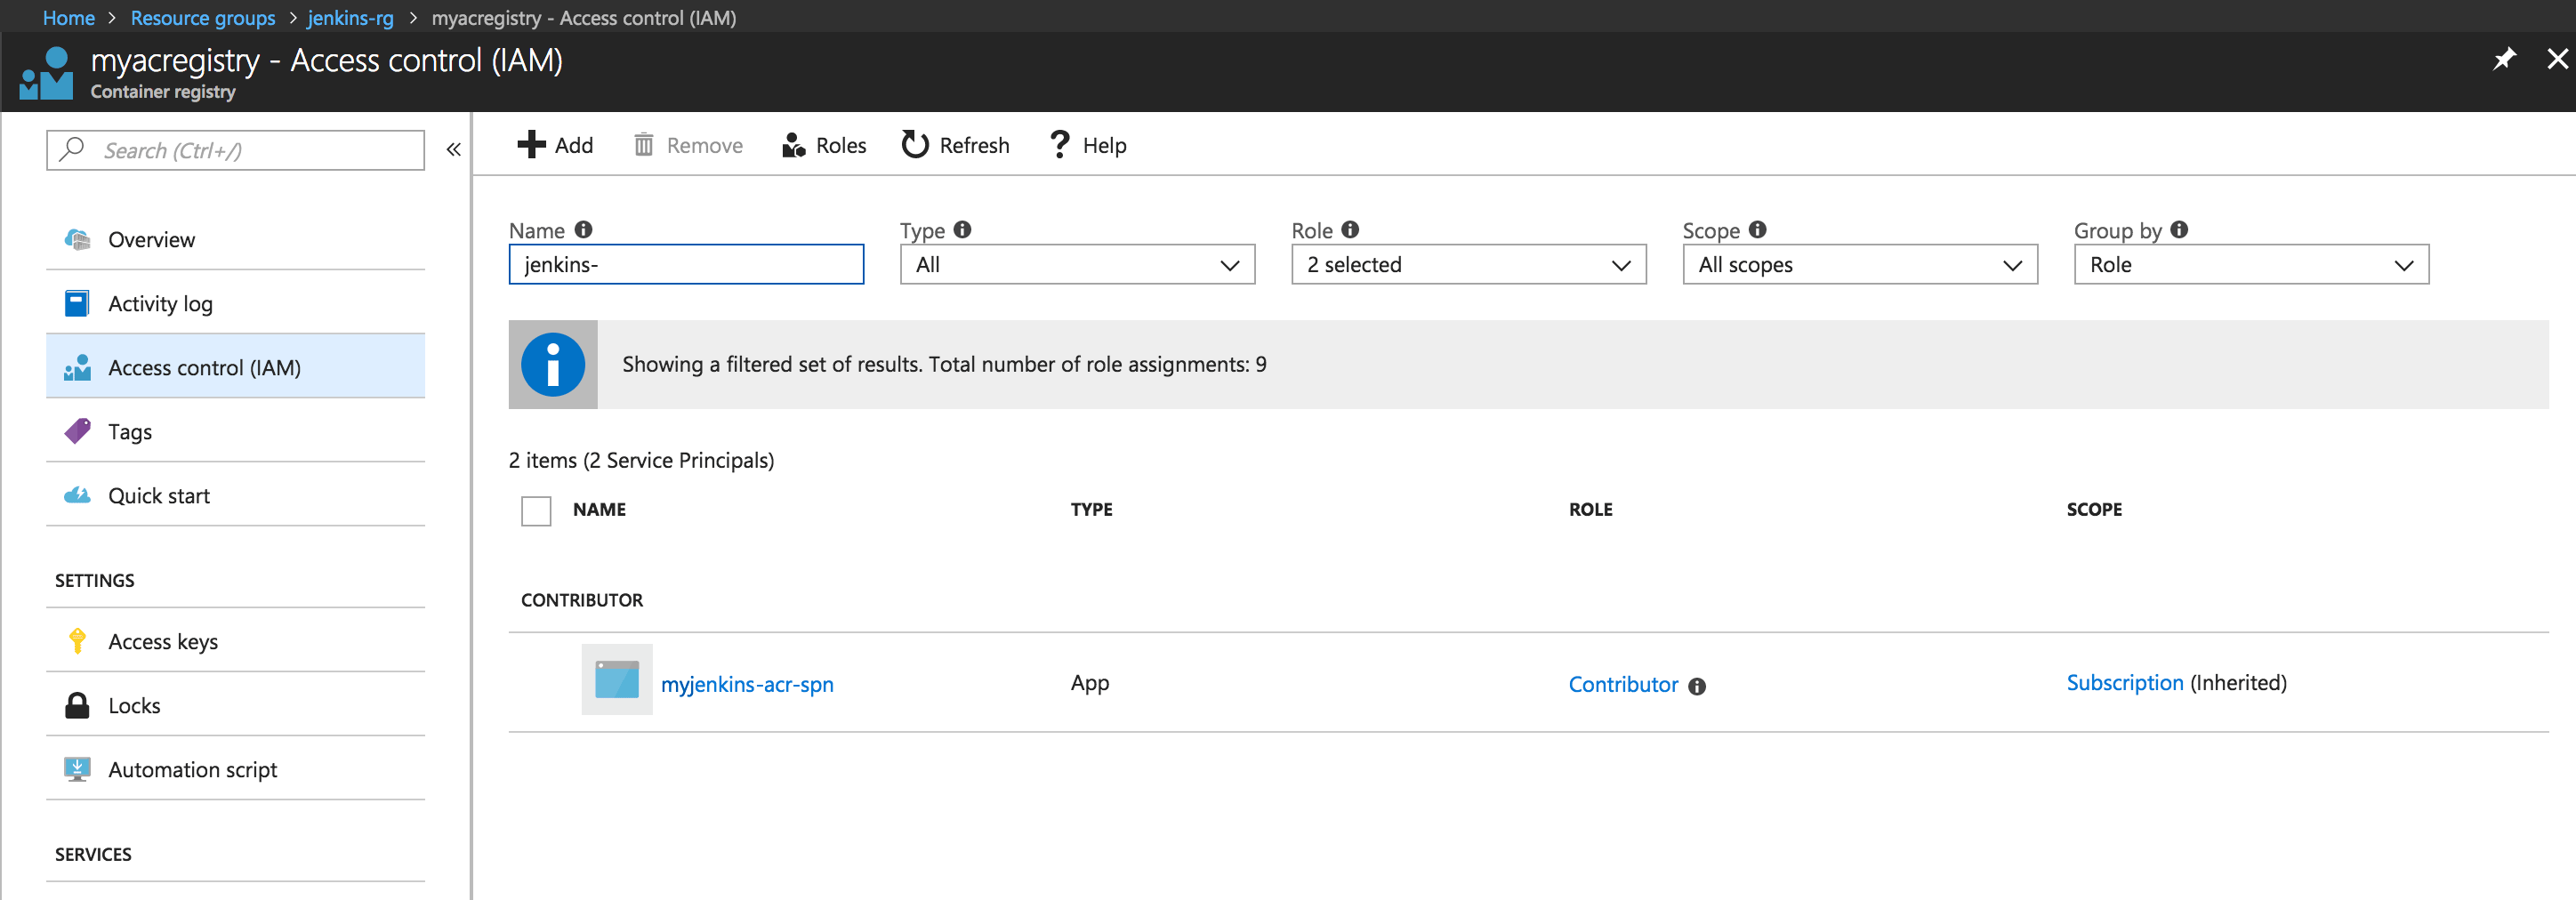
- Assign SPN to your ACR:
# SUBSCRIPTION_ID = "id" from Block 1 in step 4 above
# ACR_RESOURCE_GROUP = the Resource Group you created your ACR inside of
# ACR_NAME = the name of your ACR
# APP_ID = "appId" from Block 2 in step 4 above
$ az role assignment create --scope /subscriptions/<SUBSCRIPTION_ID>/resourcegroups/<ACR_RESOURCE_GROUP>/providers/Microsoft.ContainerRegistry/registries/<ACR_NAME> --role Owner --assignee <APP_ID>
- Note your ACR login details for later reference:
- Username: "appId" from Block 2 in step 4 above
- Password: "password" from Block 2 in step 4 above
- ACR login server URL: refer to the following screenshot

Launching and configuring a Jenkins build server in Azure
We now have ACS and ACR set up and are ready to create a Jenkins build server. For our internal use case, we chose to do this on Azure, so that's what I'll cover here:
- Create a new RSA SSH key for logging into the Jenkins server. This will be used below. Run the following from the terminal:
# Generate new key:
$ ssh-keygen -t rsa

# When prompted, enter a path to store the key, e.g. /Users/username/.ssh/myjenkinsserver_rsa
# For the sake of demonstration in this article, I left the passphrase empty

# Print the contents of the public key (for the above example, the path would be /Users/username/.ssh/myjenkinsserver_rsa.pub - note the .pub extension):
$ cat <PATH_TO_PUBLIC_KEY>
- In the left-side menu in Azure portal, click Create a resource and search for "Jenkins"
- Select the Jenkins resource with Microsoft as the publisher:

- For the sake of this article, I used the following settings on the first step of the wizard. Note that I selected the SSH public key option for authentication type and pasted the contents of the public key that I got in step 1 above:

- Complete the rest of the wizard, with default values and/or whatever is appropriate.
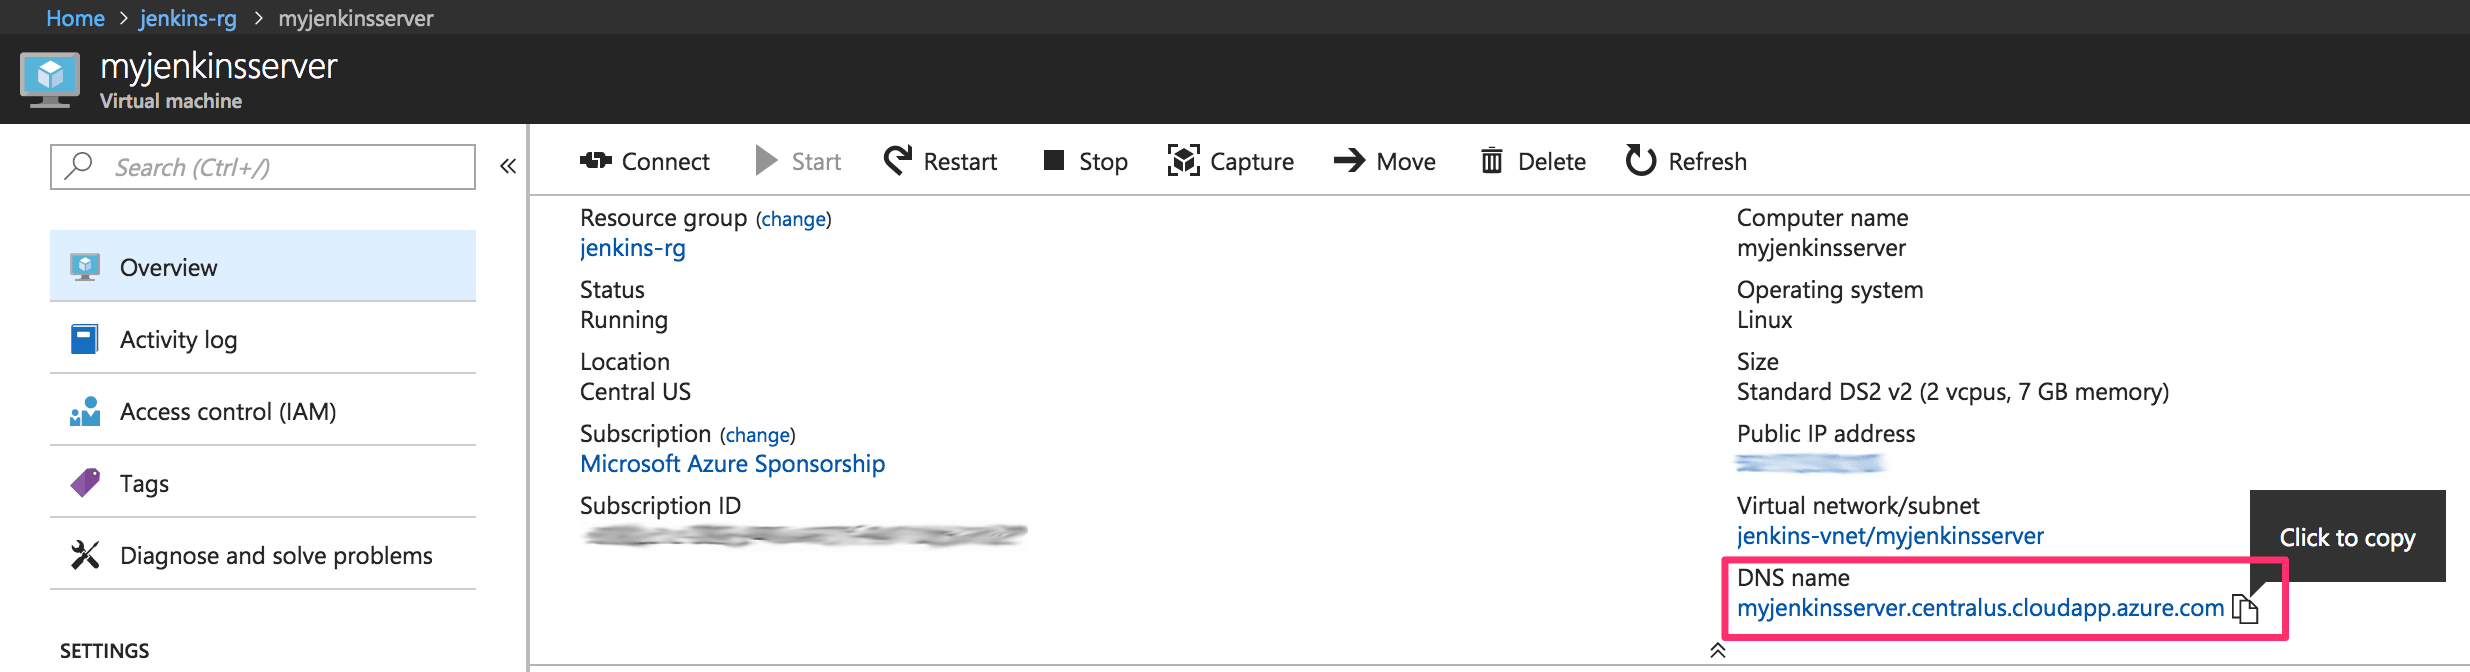
- Once the deployment has completed, copy down the new Jenkins server's DNS by clicking on the corresponding, freshly created Virtual Machine:
- Enter the DNS into your browser's address bar and you'll be greeted with something like the following security screen:
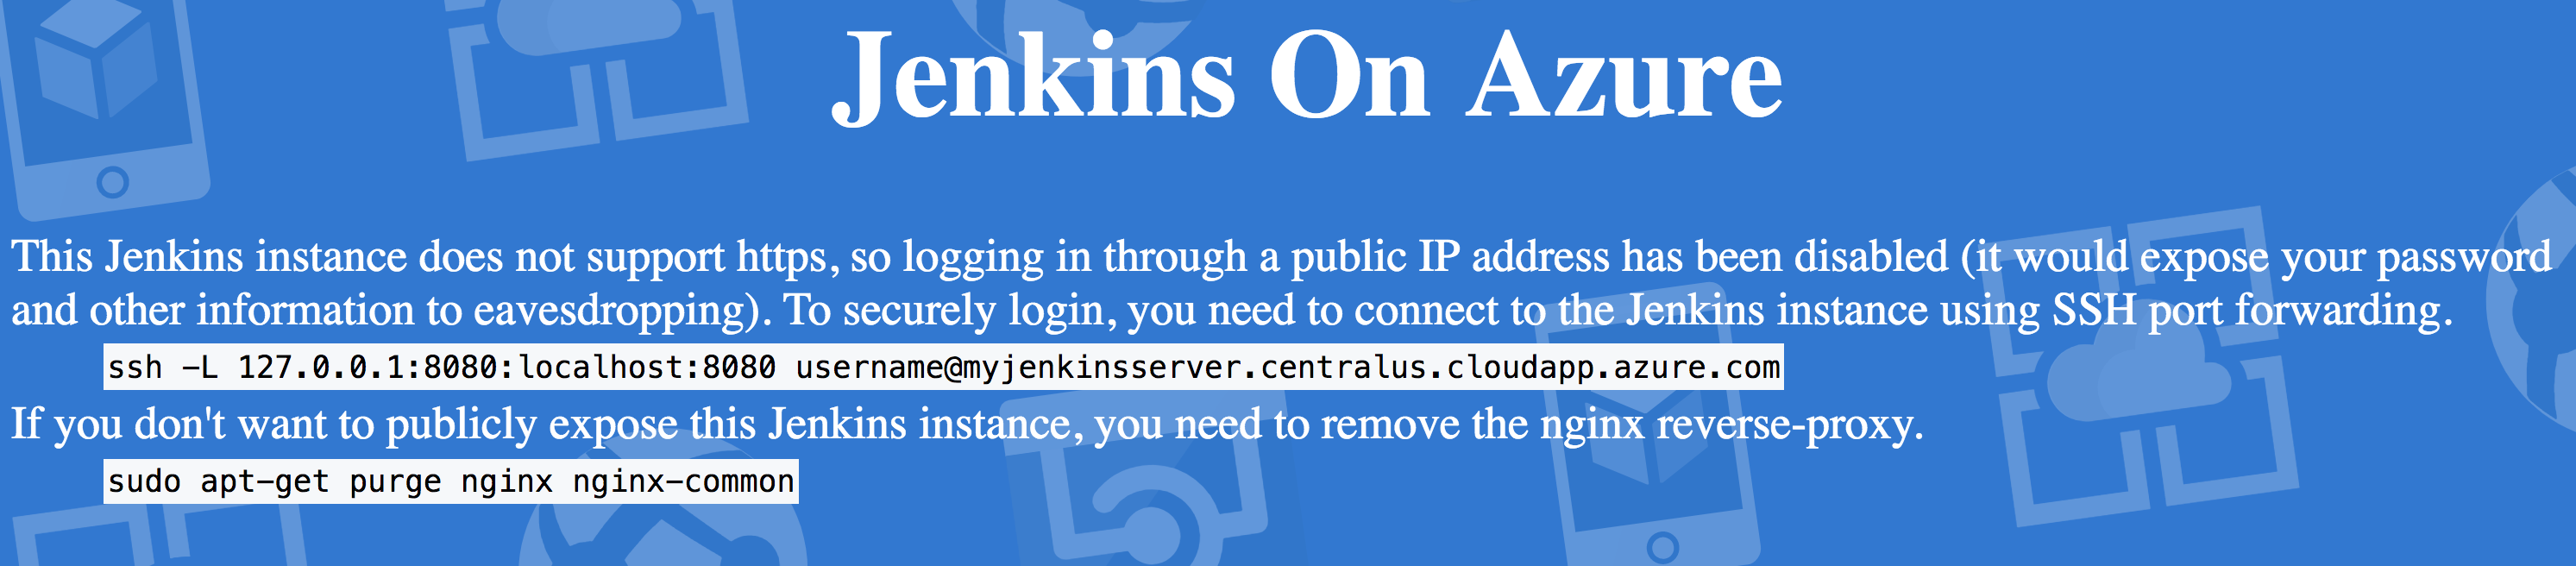
Note: I won't go into how to set up HTTPS on this server in this post, but I'll run through how to use SSH tunneling to gain access to Jenkins on this VM.
- In the terminal, run the following command to open an SSH session to the Jenkins VM and also forward port 8080 on the VM to the local port 8080. This will make Jenkins accessible via http://127.0.0.1:8080/
# Open SSH session with Jenkins VM and forward VM's locahost:8080 to local machine's port 8080
# JENKINS_USERNAME = refer to step 4 above
# JENKINS_DNS = refer to step 6 above
# PATH_TO_PRIVATE_KEY = refer to step 1 above
$ ssh -L 8080:localhost:8080 <JENKINS_USERNAME>@<JENKINS_DNS> -i <PATH_TO_PRIVATE_KEY>
- Open http://127.0.0.1:8080/ to access and configure Jenkins. Follow the instructions on the screen to log in. You'll be asked to get the initial admin password from a file on the VM. You can do this with the following command on the Jenkins VM:
# Get initial admin password
$ sudo cat /var/lib/jenkins/secrets/initialAdminPassword
- On the next screen, click Install suggested plugins to get started quickly. We'll add some extra plugins later because it seems that not all are available when following the Select plugins to install option on this screen.
- Follow the prompts to create your first Jenkins admin user.
- Once the setup wizard completes, go to Manage Jenkins > Manage Plugins and then open the Available tab. The Azure Jenkins VM appears to be pre-configured to install a lot of the Azure (and other) plugins by default, which may or may not be the case for a completely fresh Jenkins install on different architecture. Please feel free to confirm or deny in the comments. If your setup doesn't work due to missing plugins, let me know and I'll provide the full plugin list that is running on our Azure installation. Below is the list of extra plugins that I selected to install beyond the defaults. You may not need them all depending on your final requirements.
- BitBucket
- Build Pipeline
- External Monitor Job Type
- Global Slack Notifier
- Icon Shim
- JQuery
- Maven Integration
- Mercurial
- Parameterized Trigger
- Run Condition
- Slack Notification
- SSH Agent
- SSH
- Now it's time to install Docker on the Jenkins server so that images can be built and remote Docker commands can be executed from this build server. Run the following commands in the SSH terminal session on the Jenkins server:
# Install Docker and dependencies
# Ref: https://docs.docker.com/v17.09/engine/installation/linux/docker-ce/ubuntu/#install-using-the-repository
$ sudo apt-get -y update
$ sudo apt-get -y upgrade
$ sudo apt-get -y install \
     apt-transport-https \
     ca-certificates \
     curl \
     software-properties-common
$ curl -fsSL https://download.docker.com/linux/ubuntu/gpg | sudo apt-key add -
$ sudo apt-key fingerprint 0EBFCD88
$ sudo add-apt-repository \
    "deb [arch=amd64] https://download.docker.com/linux/ubuntu \
    $(lsb_release -cs) \
    stable"
$ sudo apt-get -y update
$ sudo apt-get -y install docker-ce

# Give Jenkins permission to run Docker commands
# Full credit to Jessica Dean for helping out with this step
# Ref: http://jessicadeen.com/tech/pro-tip-jenkins-and-docker-build-server/
$ sudo usermod -aG docker $USER
$ sudo usermod -aG docker jenkins

# Configure NginX to accept webhook calls from BitBucket on <JENKINS_URL>/bitbucket-hook/
$ sudo nano /etc/nginx/sites-enabled/default
# Replace contents with this file: https://github.com/abakonski/bitbucket-jenkins-acs-pipeline/blob/master/etc/nginx/sites-enabled/default
# This will disable access to Jenkins from the public internet (without SSH tunneling), leaving only the webhook enabled.
# Customize the URL for the webhook by changing the line: "location /bitbucket-hook/ {"

# Reboot the server
$ sudo reboot
NOTE: You could enable access to the Jenkins server without SSH tunneling, but it wouldn't be a good idea to leave this running without SSL. I won't be running through how to configure SSL on this Jenkins server in this post.
- Test your ACR login by opening an SSH connection to the Jenkins server again (once it has had enough time to reboot after the above steps) and run the following command:
# ACR login details are in step 8 of the "Set up a Service Principal Name for Azure" section of this article
# You will be prompted for username and password
$ docker login <ACR_SERVER_URL>
Configuring BitBucket
Now it's time to configure BitBucket to notify Jenkins whenever code is pushed to the repository. This is done via the Jenkins webhook:
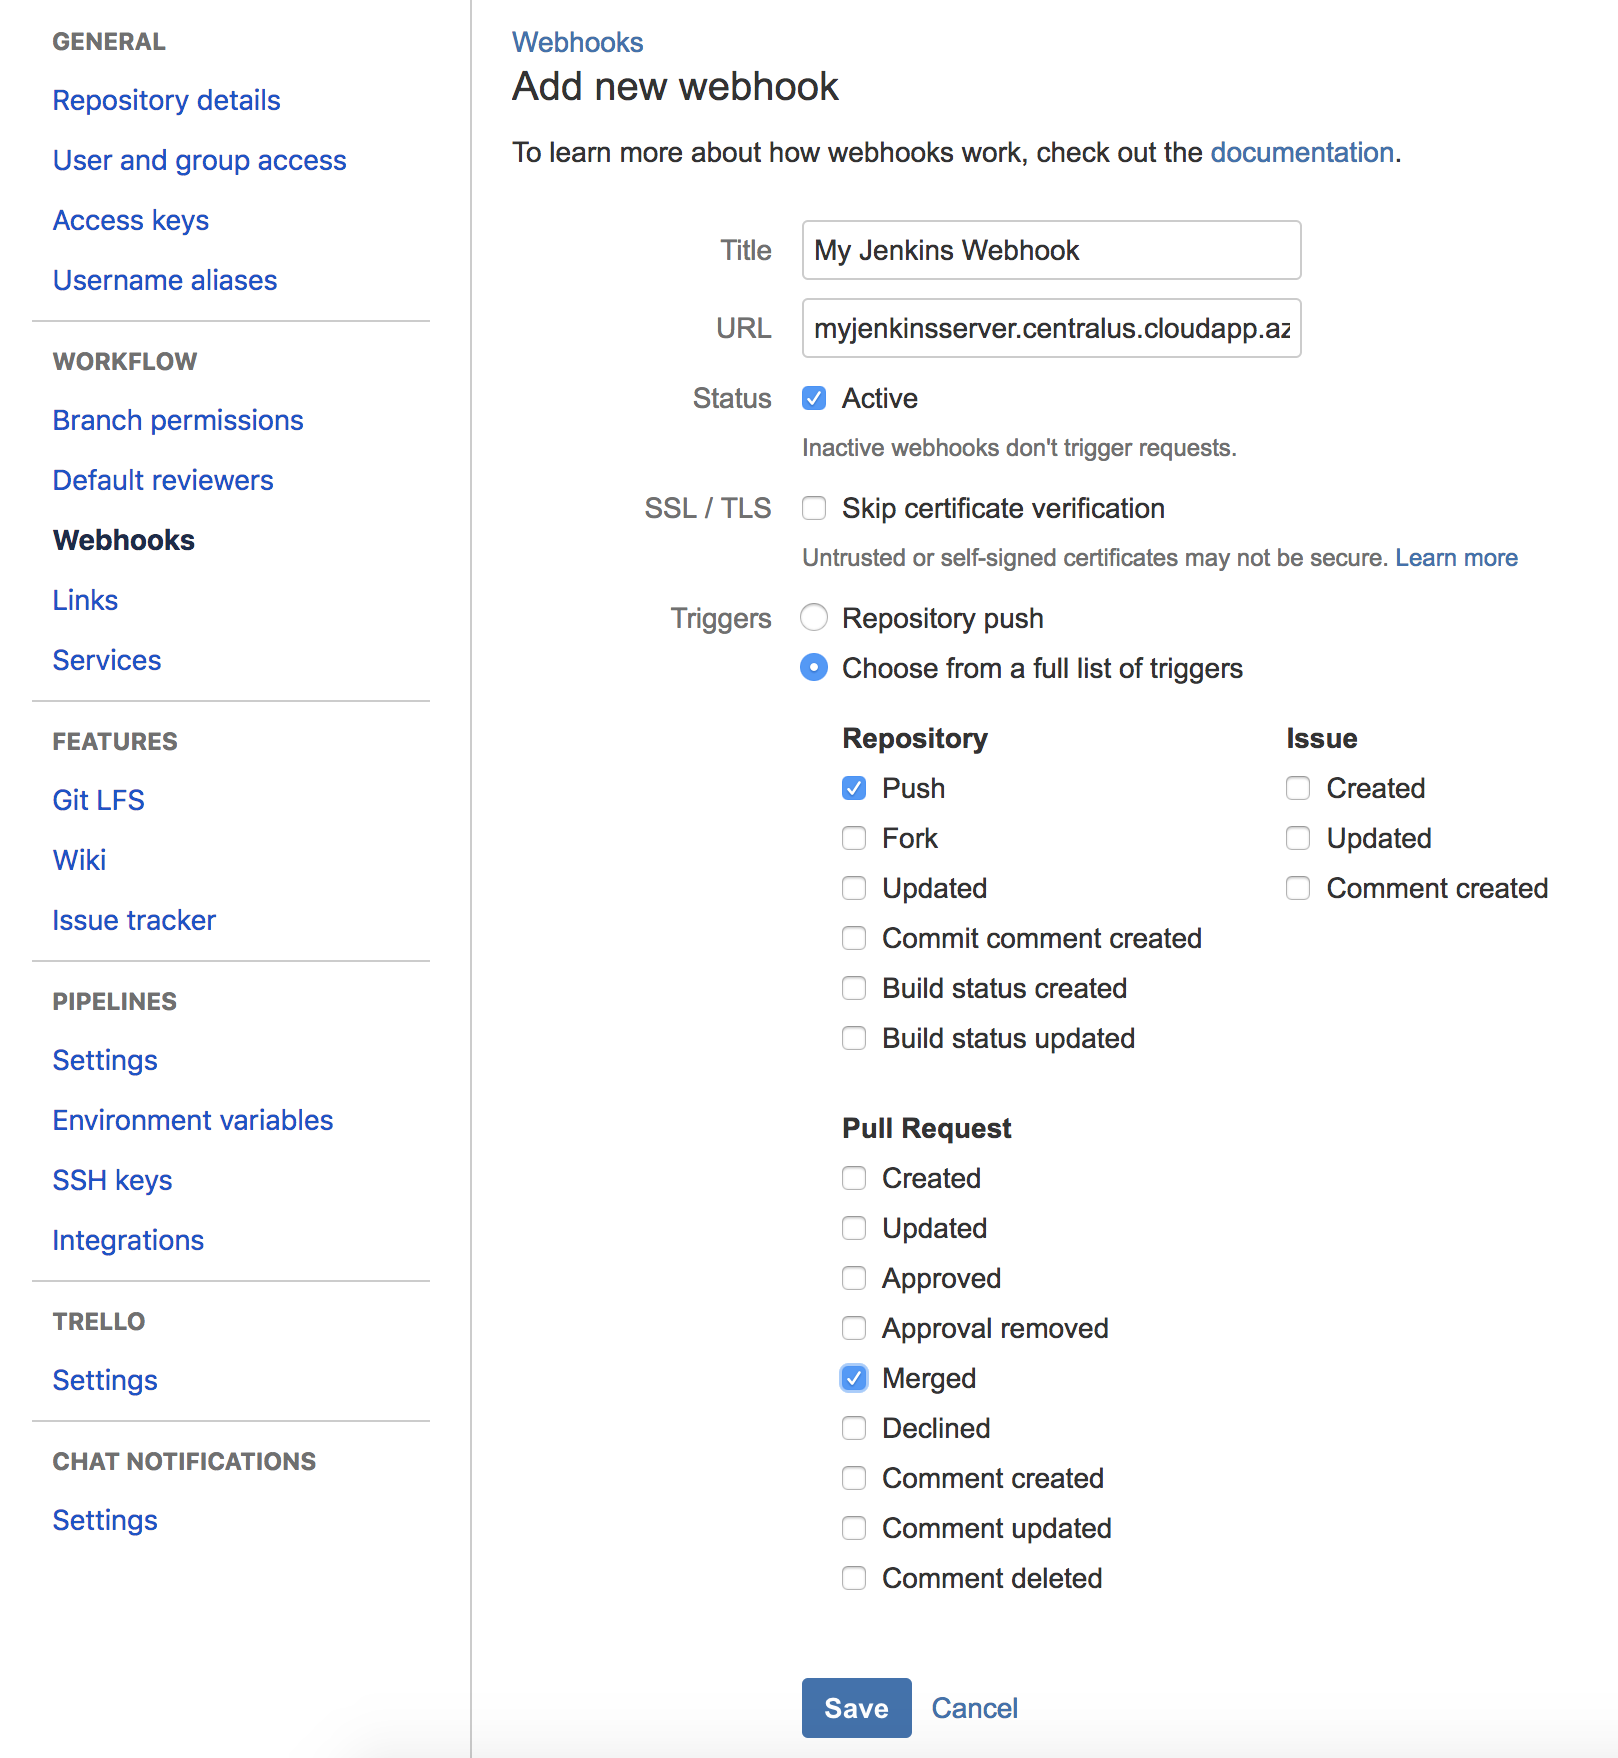
- Open the project settings for your BitBucket repository and click Add webhook:
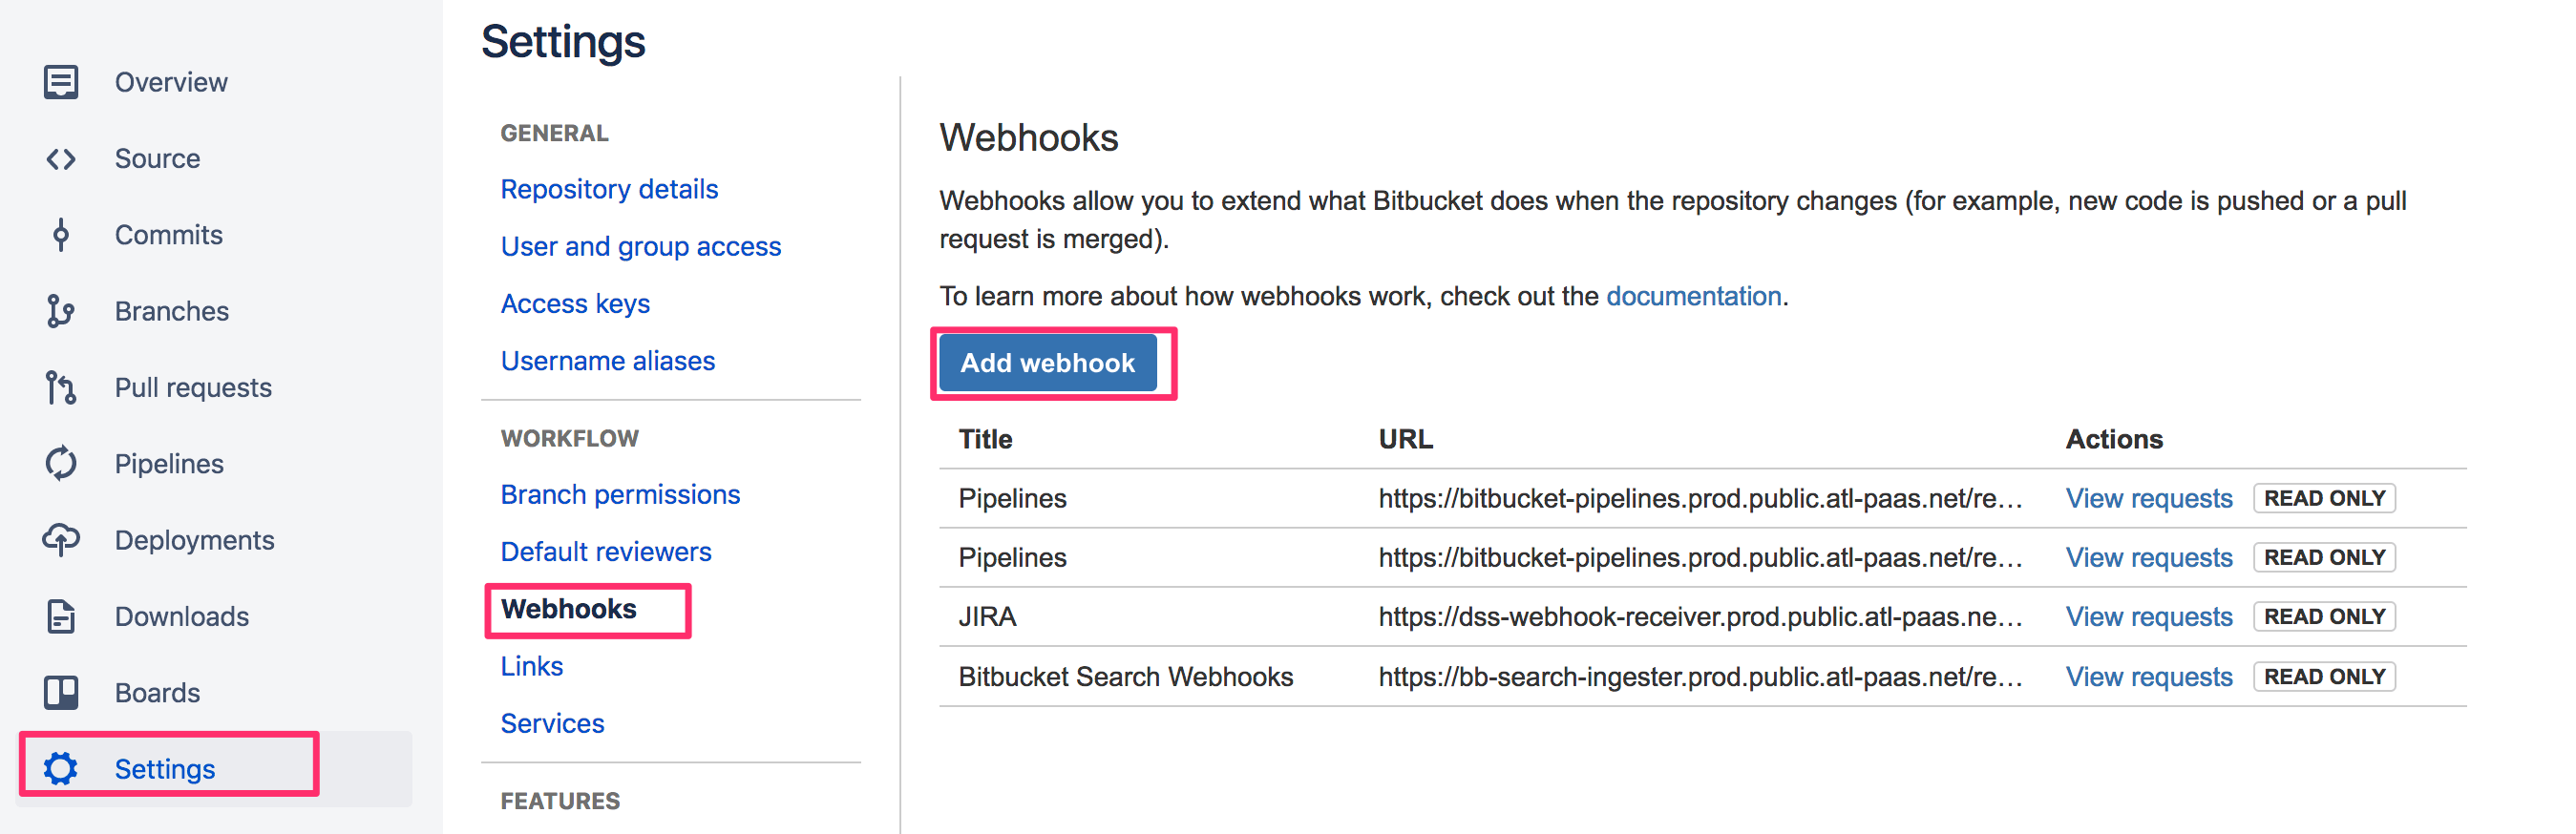
- Configure a webhook with the URL "<JENKINS_URL>/bitbucket-hook/". For triggers, select Repository: Push and Pull Request: Merged:
Configuring Slack Integration
It's always a good idea to communicate build processes (attempts, successes and failures) to the team. We use Slack internally for a lot of our communications, so I decided to have Jenkins report on all deployments. This is an optional step, but I highly recommend it. First, we'll need to configure Slack to accept messages from Jenkins, and then we'll configure Jenkins:
- Create a channel in Slack. In this walkthrough, I'm going to use "#jenkins-builds"
- Go to https://slack.com/apps/
- Sign in
- Search for "Jenkins"
- Click Add Configuration
- Choose the "#jenkins-builds" channel and click Add Jenkins CI integration
- The next page will provide instructions on how to configure the Slack plugin within Jenkins. You should only need to follow the first 3 steps at this point
Creating the Jenkins jobs
Finally, it's time to create the jobs in Jenkins. These will use BitBucket pushes as a trigger, perform the Docker image build, and deploy the code changes to ACS. To do this, Jenkins will need to be able to connect to BitBucket, Azure Container Registry, and Azure Container Service. We'll configure the required credentials first.
Configuring required credentials in Jenkins
- Log into the Jenkins admin
- On the home screen, select Credentials, then System, then click the Global credentials domain
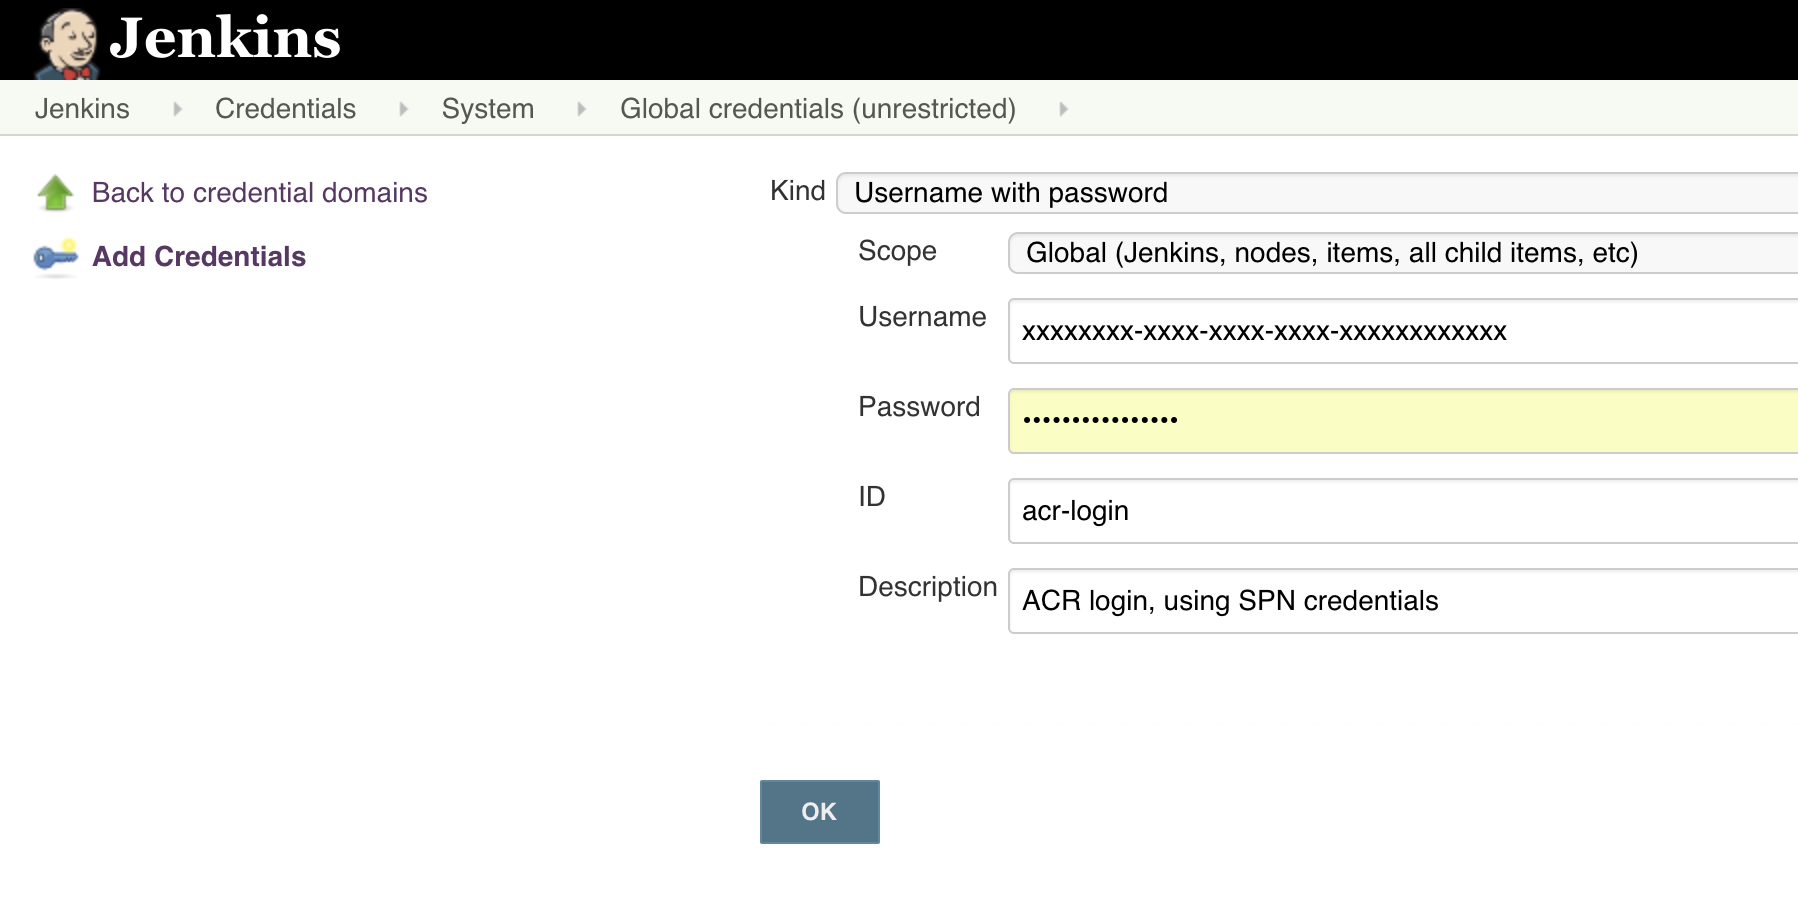
- Click Add credentials to create the ACR credentials:
- Kind: "Username and password"
- Scope: "Global"
- Username: Application ID of the SPN created in the Set up a Service Principal Name for Azure section of this post
- Password: Password of the SPN created in the Set up a Service Principal Name for Azure section of this post
- ID: "acr-login"
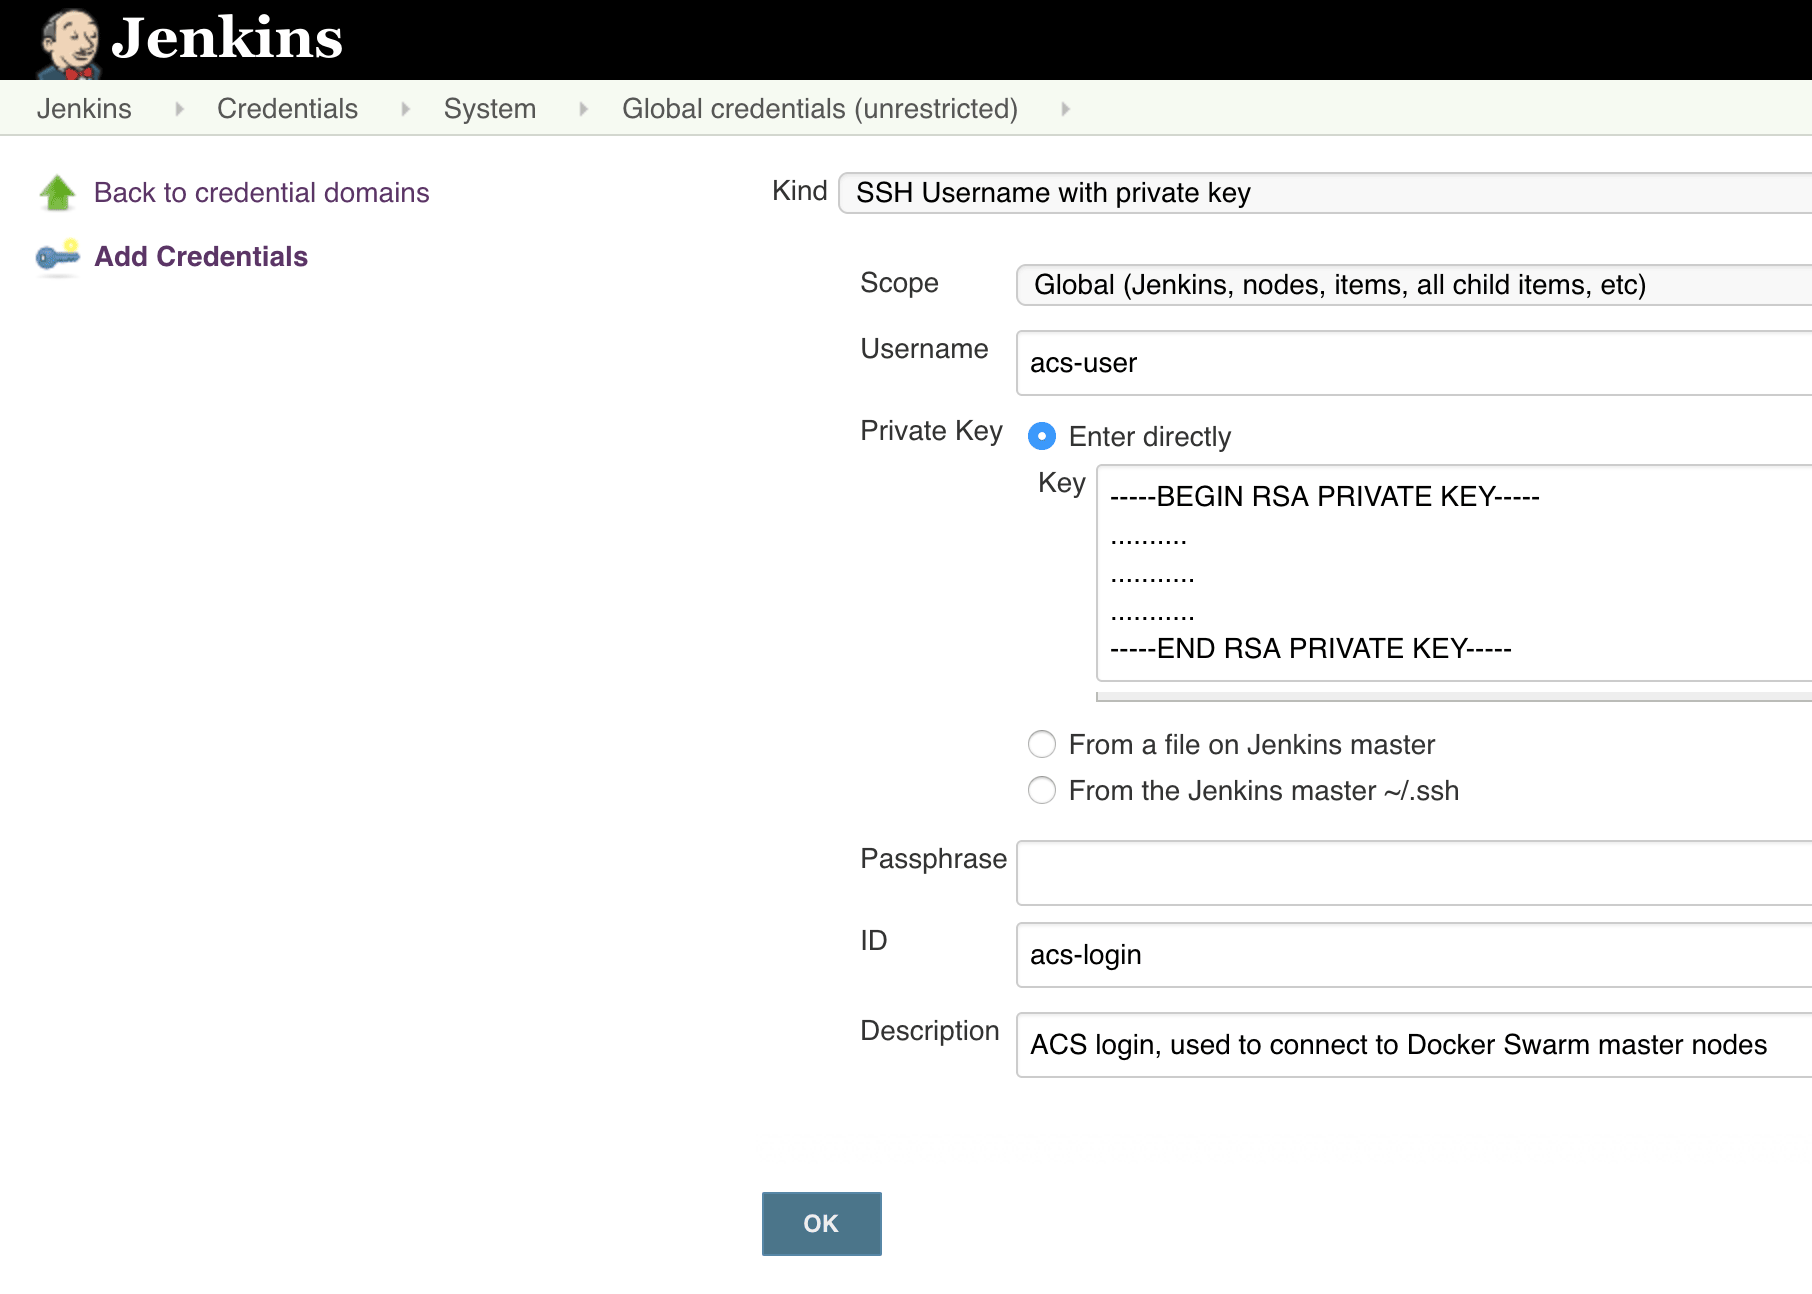
- Click Add credentials to create the ACS credentials:
- Kind: "SSH Username with private key"
- Scope: "Global"
- Username: SSH username for your ACS (refer to the second post in this series)
- Private key: Choose "Enter directly" and paste in the contents of your ACS SSH private key (refer to the second post in this series)
- Passphrase: SSH passphrase (if applicable) for your ACS (refer to the second post in this series)
- ID: "acs-login"
- Click Add credentials to create the BitBucket credentials. There are various ways of logging into BitBucket. For pipelines in Jenkins, I recommend using SSH access keys:
- Kind: "SSH Username with private key"
- Scope: "Global"
- Username: "git"
- Private key: Choose "Enter directly" and paste in the contents of your BitBucket SSH private key
- Passphrase: SSH passphrase (if applicable) for your BitBucket SSH key
- ID: "bitbucket-login"
Setting up jobs in Jenkins
Now comes the juicy part: setting up the actual jobs that will automatically deploy your BitBucket pushes.
At the time of writing, there are some limitations with BitBucket integration in Jenkins. To the best of my knowledge, there's currently no way to create a Pipeline job in Jenkins that is triggered by a BitBucket push on any branch other than master. This is a pretty big limitation if you use different branches for different deployments. For example, we use a develop branch for all code that is ready to go out to a staging environment. In our case, the master branch is only used once we're happy with a production release. The workaround for this limitation is to create 2 different jobs — a Freestyle project, which is capable of being triggered by a push to any branch in BitBucket, and a Pipeline job to do the actual building and deployment. The Pipeline job can be triggered by the completion of the Freestyle project.
Creating a Freestyle project
We'll start by creating the Freestyle project that will be triggered by a push in BitBucket. In this example the job will only be triggered by a push on the develop branch:
- Navigate to Jenkins > New Item
- Enter something like "MyApp-BBHook-Staging" in the Name field and choose Freestyle project. Click Next.
- Scroll down to Source Code Management
- Enter your BitBucket repository URL
- Select your BitBucket SSH credential
- Enter "*/develop" in the Branches to build section

- Scroll down to Build Triggers and select Build when a change is pushed to BitBucket

- Scroll down to Post-build Actions, select Slack Notifications and finally select Notify Build Start and anything else you'd like to be notified about
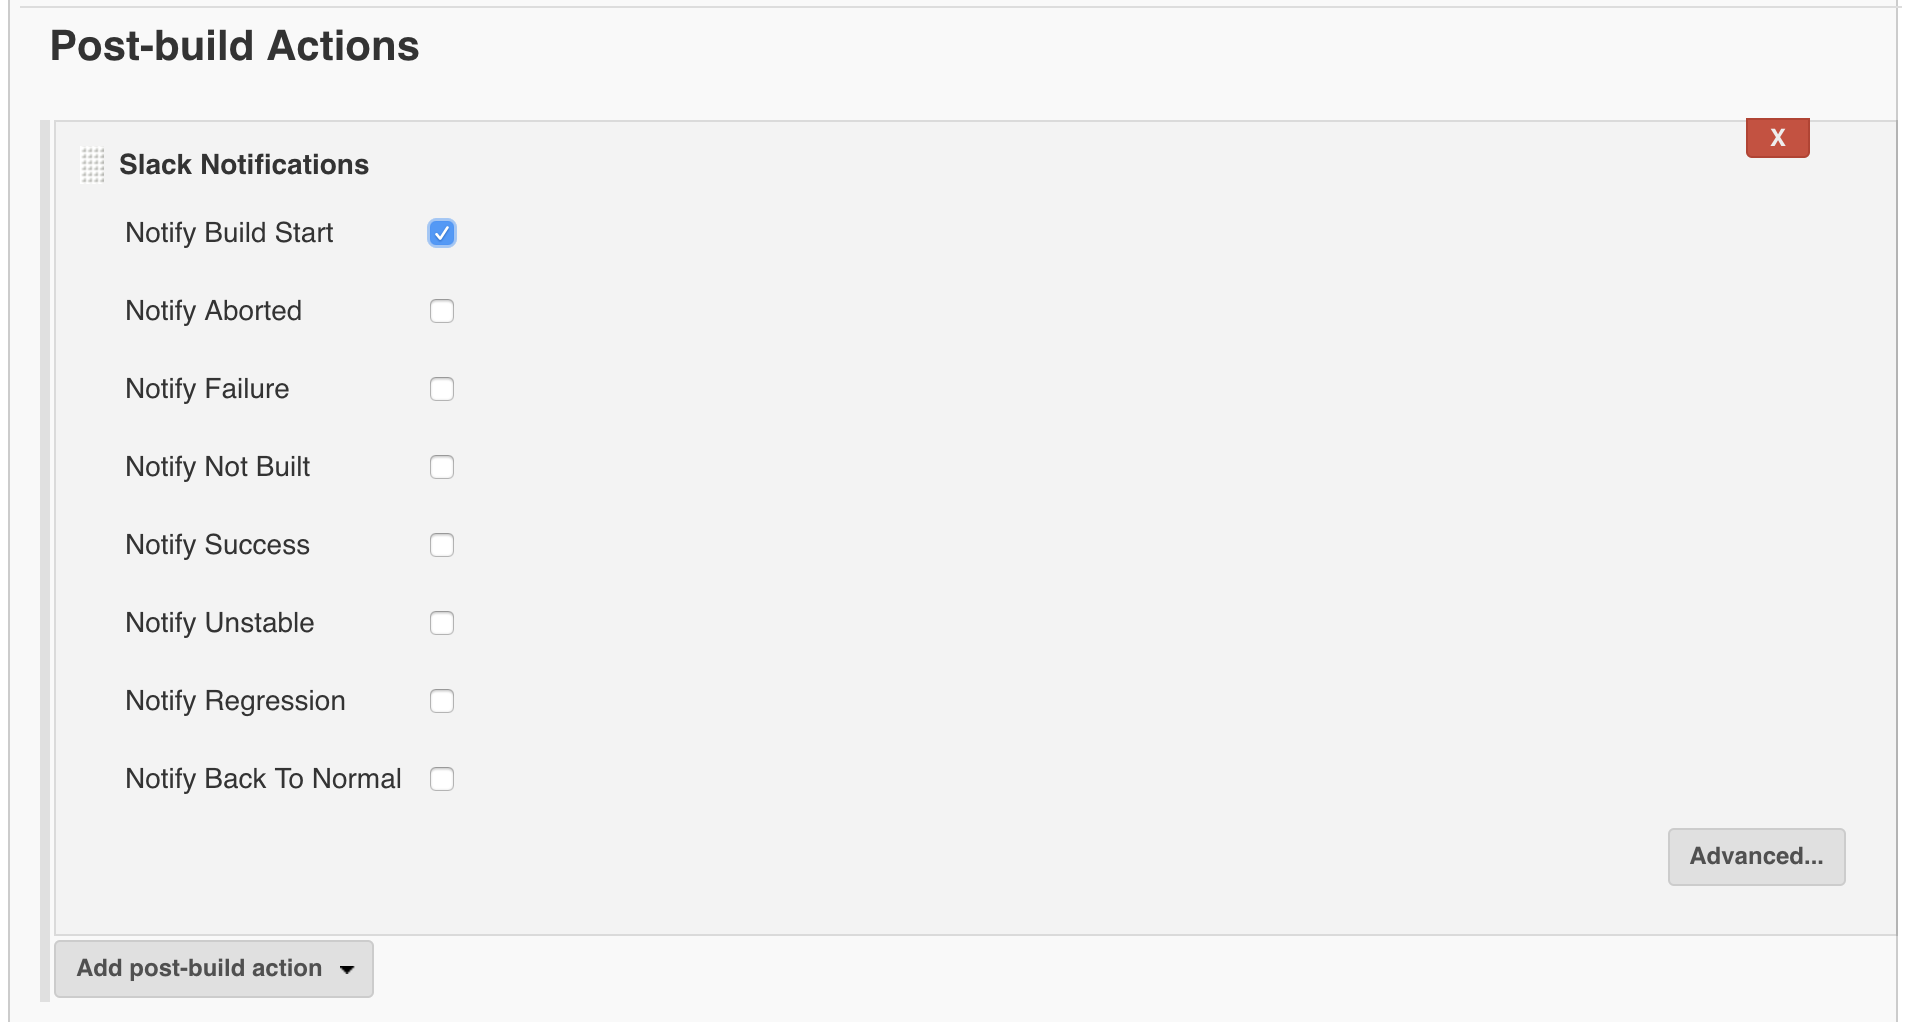
- Click Save
Creating a Pipeline job in Jenkins
This job will do all the heavy lifting, which includes:
- Pulling code from BitBucket
- Building the Docker image
- Pushing the image to ACR
- Connecting to ACS
- Pulling the Docker image to ACS
- Deploying the stack — as defined by docker-compose.yml - to the ACS cluster
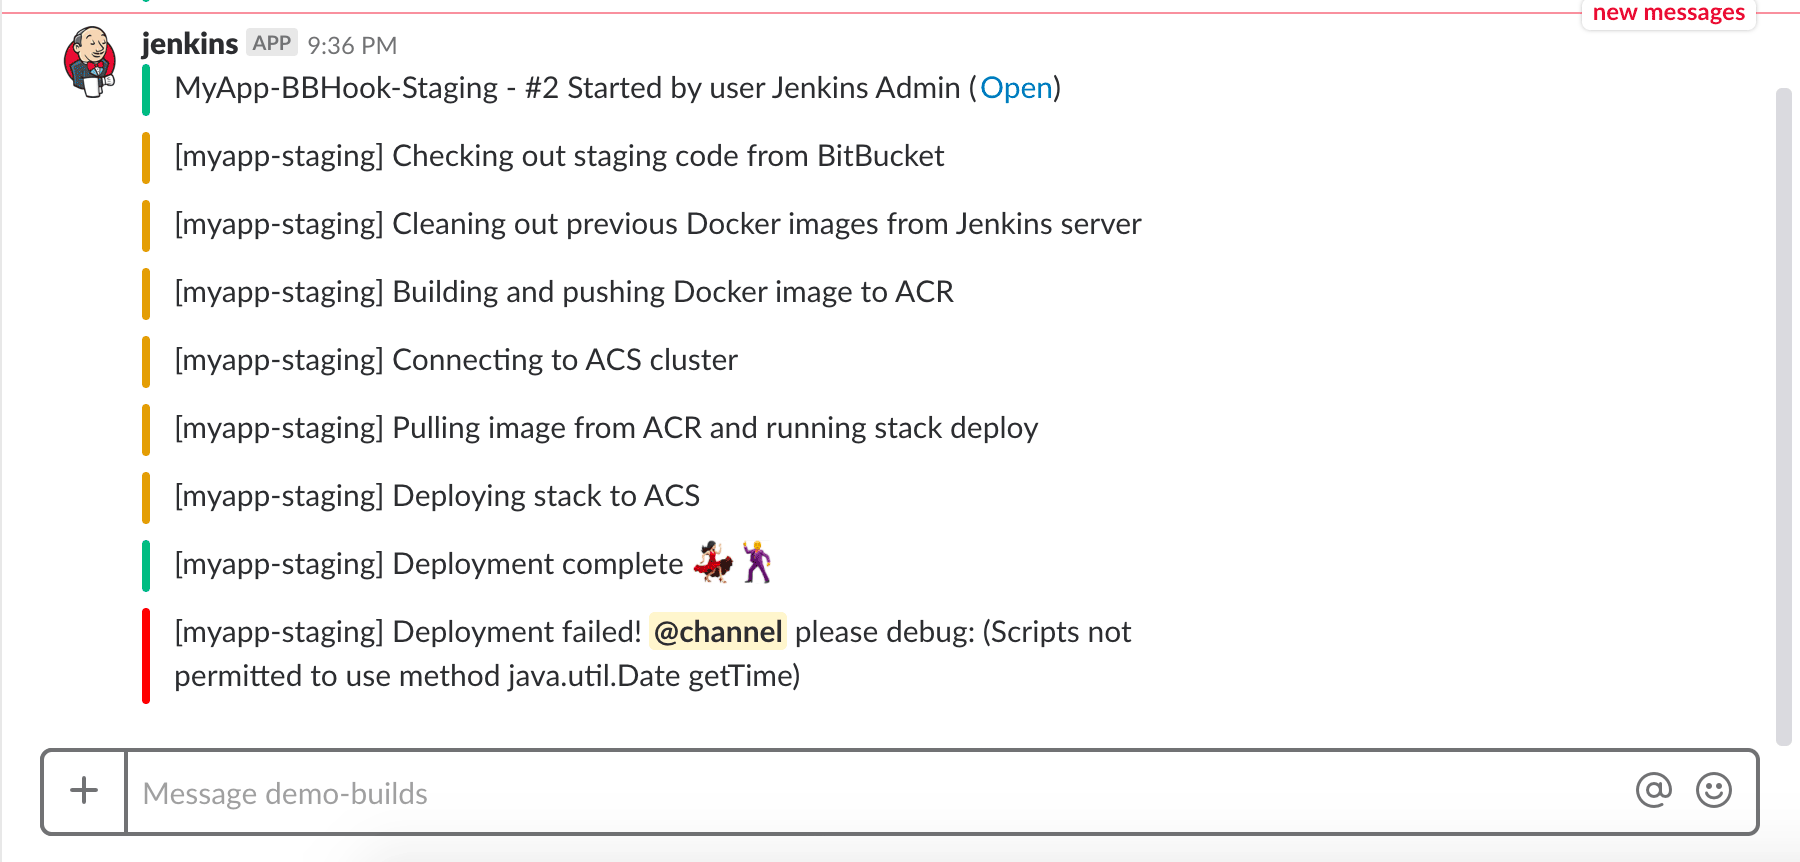
At each step, Slack notifications will be sent out.
To set up this Pipeline job:
- Navigate to Jenkins > New Item
- Enter something like "MyApp-Pipeline-Staging" in the Name field and choose Pipeline. Click Next.
- Scroll down to Build Triggers
- Select Build after other projects are built
- Enter "MyApp-BBHook-Staging"
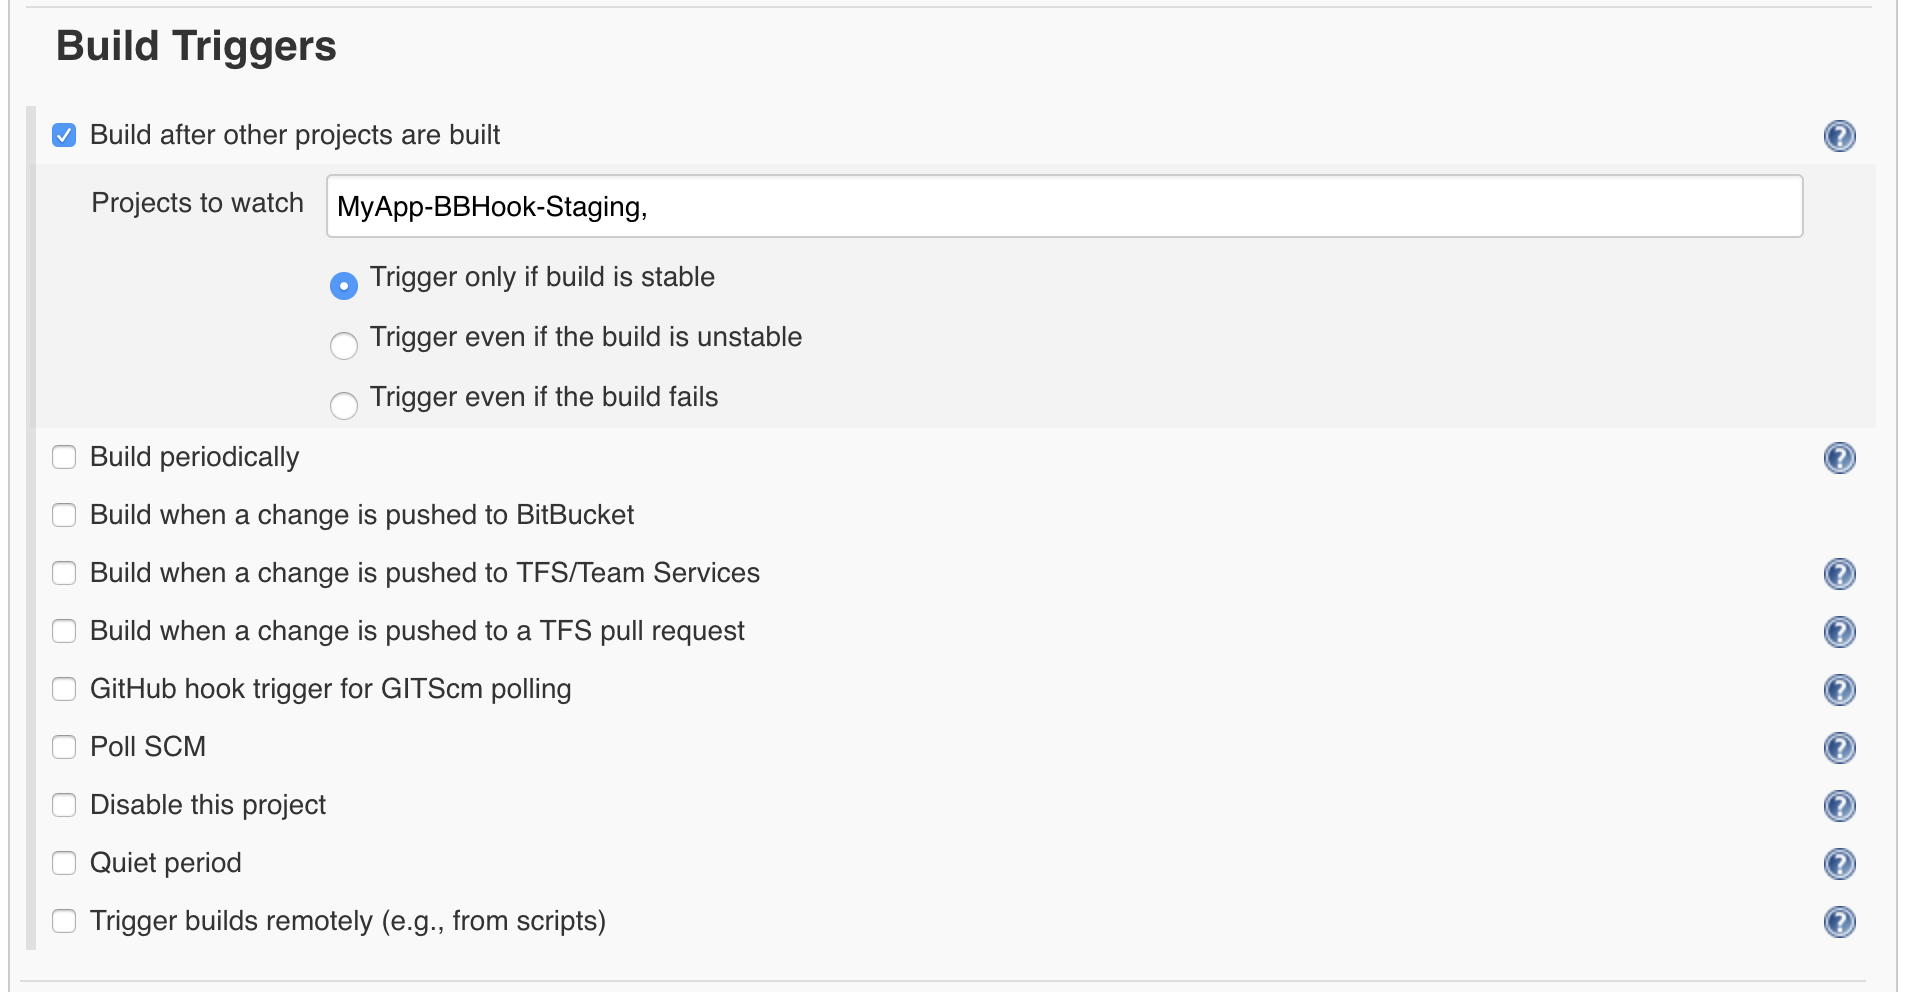
- Scroll down to Pipeline
- Leave Pipeline script selected
- Modify the contents in this Groovy script to suit your needs and paste it into the Script text box
- Click Save
Testing the pipeline
There's just one step left at this point: testing.
- Go to Jenkins > MyApp-BBHook-Staging
- Click Build Now
- The first time you attempt to build this flow, it's very likely that the Pipeline job will throw out an error. This is because Jenkins is missing some permissions to execute certain methods in Pipeline scripts
- To fix this error, go to Jenkins > Manage Jenkins > In-process Script Approval
- You should see a signature awaiting approval. Click Approve
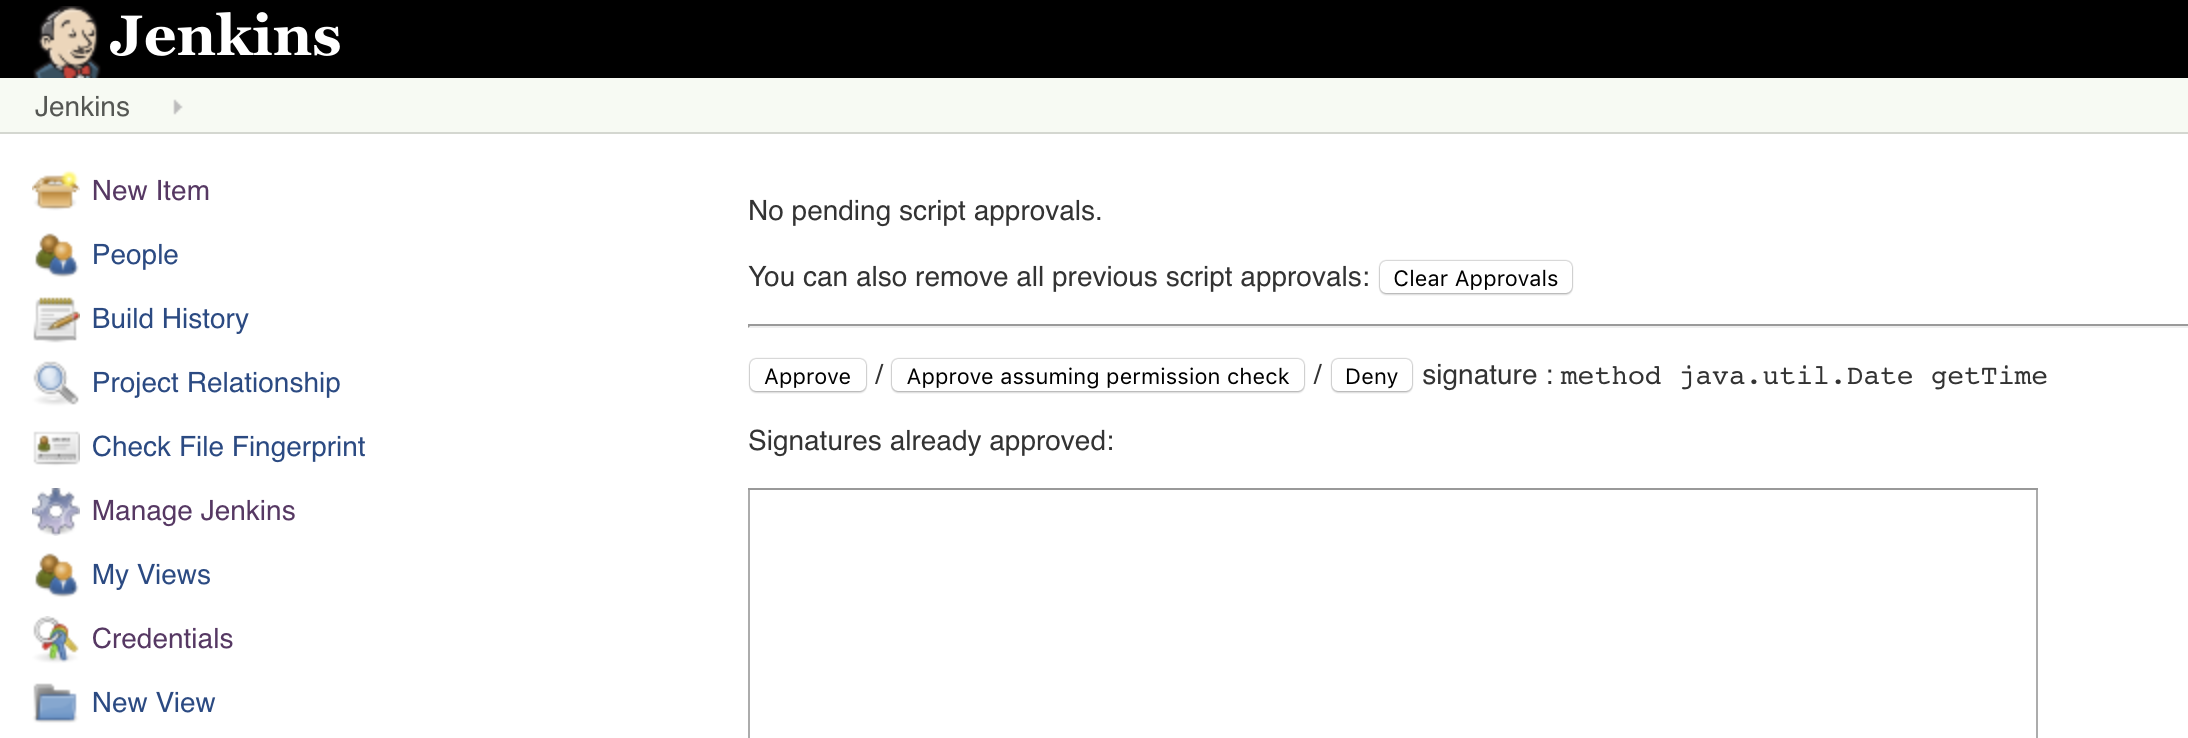
- Build the MyApp-BBHook-Staging job again
- If everything builds correctly this time, test the entire process end-to-end by pushing a change to your project's develop branch on BitBucket to kick off an automated deployment
Final words
That's it! If you've made it this far, congratulations — you should be able to create a Dockerized version of your app and create a full Continuous Deployment pipeline into Azure Container Services, triggered by a BitBucket push.
If you've enjoyed this series or if you have any comments, feedback, questions or thoughts on how these processes could be improved, please let me know in the comments.