In the first part of this article series I walked through setting up a cluster in Amazon ECS. This also includes leveraging Amazon ECR as the image repository that will be used for deploying new versions of our sample app to the cluster. In this post, I'm going to walk through the Jenkins configuration required so that a merge in BitBucket automatically triggers a Jenkins job that in turn deploys a new build in Amazon ECS.
I've already covered the process of setting up BitBucket and Jenkins in a previous article, so this article will only fill in the gaps that are specific to this ECS setup. If you haven't already set up a Jenkins server and configured the BitBucket hook, first do so by following the instructions in that article, and then come back to complete the Jenkins setup outlined below.
Configuring the required credentials in Jenkins
By now you should have a Jenkins server running with all the appropriate plugins installed. You should also have Docker installed on the same machine.
In the first article in this series, we discussed the IAM credentials that will be used to push new Docker images to Amazon ECR. I used my admin IAM credentials in the initial setup, but for this part of the process I very strongly recommend creating an IAM user with ECR write permissions for just the repository that Jenkins needs to write to. As a rule, I create a new IAM user for each isolated process and I give it only the permissions that it needs to do its job. It's a really bad idea to create open IAM users and reuse them across multiple processes, multiple code bases, etc. This goes for team members as well - each gets their own login with only the permissions that they need to do their job.
1. Log into the Jenkins admin
2. On the home screen, select Credentials, then System, then click the Global credentials domain
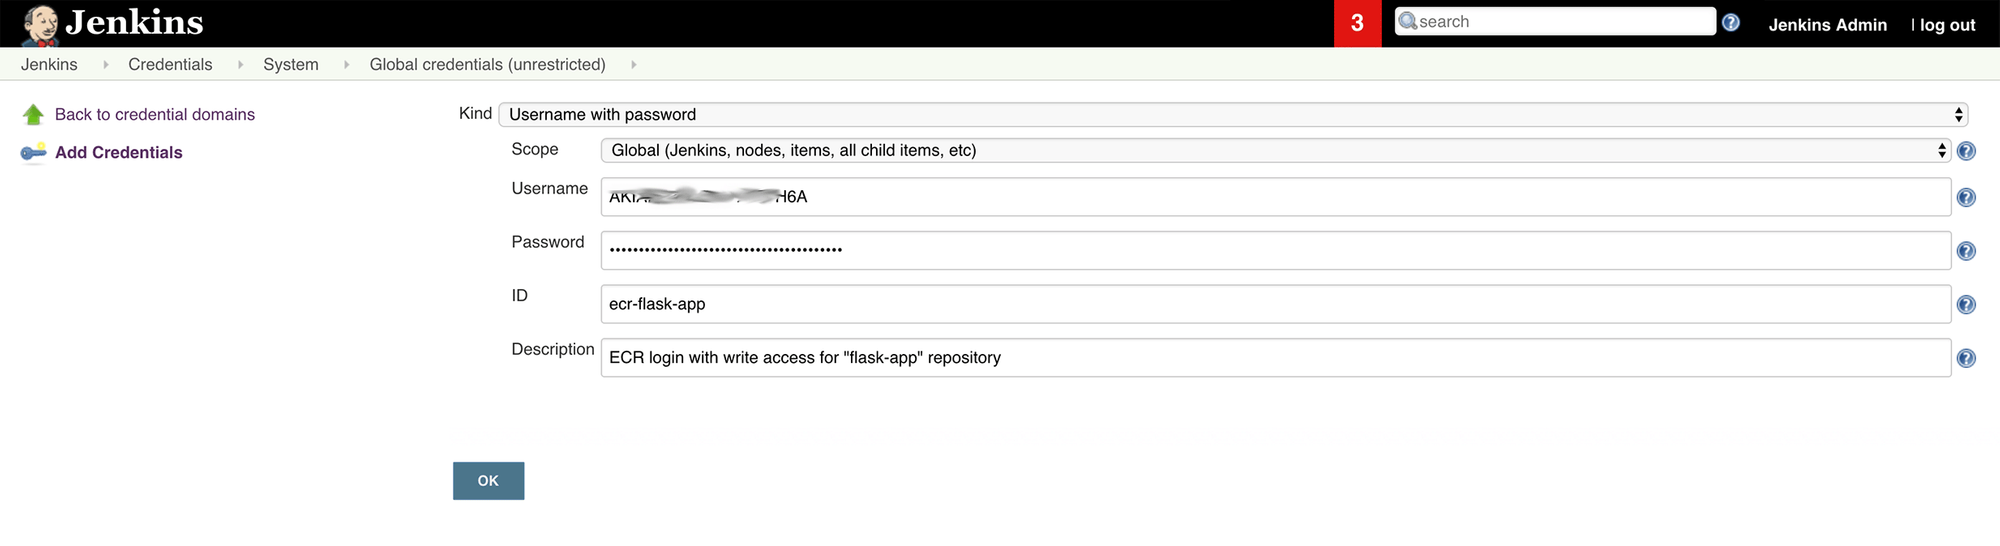
3. Click Add credentials to create the ACR credentials:
- Kind: "Username with password"
- Scope: "Global"
- Username: Access key ID of the IAM user that has ECR write permissions on the "flask-app" repository
- Password: Secret access key of the IAM user that has ECR write permissions on the "flask-app" repository
- ID: "ecr-flask-app"
Configuring the build jobs in Jenkins
As I mentioned in this article, there is currently a limitation in Jenkins in that there's currently no way to create a Pipeline job in Jenkins that is triggered by a BitBucket push on any branch other than master. Because we tend to do multiple stages of deployments (any combination of: alpha, beta, QA, staging, production, etc), this limitation isn't acceptable. The workaround is to use a two-job process. The first job is a Freestyle Job, which can be configured to run when a merge happens on any branch. This job will simply act as a trigger for the Pipeline Job, which will do the actual building and deploying to ECS.
I've outlined the process of creating the Freestyle and Pipeline jobs here. Follow the same steps to build your Freestyle job, using your appropriate BitBucket repo address and branch.
The next step is to configure the Pipeline job. Again, you can follow the instructions in the same article. The obvious difference here will be the Pipeline script. You can use my example Groovy script. Just make sure to modify it to suit your environment first. The main things you will definitely need to change are the imageName, clusterName, serviceName, taskFamily and desiredCount variables at the top of the script.
If you read through the script, you'll notice that there are two deployment files that you will need to include in your repo for your Pipeline job to succeed:
- ecs-task.json - this is the Task Definition file. You will need to update at a minimum the containerDefinitions.image value to represent the image in your own ECR, but keep the
:%BUILD_NUMBER%suffix. We use this to choose the correct image tag/version in the Jenkins build process. - ecs-wait.sh - this is a script I wrote to monitor when ECS has fully cut over to your new deployment. It will wait a maximum of 10 minutes for ECS to start your new task version(s) and enter a stable state. If that 10 mins elapses without reaching this stable state on your new version, an error will be thrown to your chosen Slack channel. If it succeeds, you'll get a success message instead.
This step is optional, but it personally helps me a lot in terms of knowing when deployments complete and whether they've succeeded or failed.
One thing you should be aware of with the 10 minute cap on this process is that there are a number of factors that could actually make your cutovers take a long enough time that you'll never get a stable release in that time period. The place to start troubleshooting this is the "Deregistration delay" setting on your Target Group (go to EC2 > Load Balancing > Target Groups in the AWS console).
Testing the pipeline
The final step is naturally going to be to test your new pipeline. I've outlined testing in my previous article as well and it covers a common issue with a build error that you may encounter at this point.
Once you've successfully tested the pipeline by building your Freestyle job directly from Jenkins, your BitBucket merges into the branch you configured above will trigger this job automatically.
Final words
I really hope you've found this article series helpful. Since I've written it, Amazon have released the Fargate launch type in ECS. I've migrated all my ECS clusters to Fargate a while ago now and so far I'm loving it. I found the EC2 launch type to be too difficult to control efficiently in terms of resource management and task placement strategies. I was also noticing a lot of intermittent ECS Agent failures on the EC2 instances and would end up needing to regularly cycle EC2 instances out.
I'm finding Fargate to be much more efficient with resources, much easier to scale and I'm experiencing virtually no failures as far as ECS goes. Of course there are code and server setup issues that creep in here and there, but I can hardly blame Amazon for that!
If you're interested in trying Fargate out instead of EC2 launch type, these 2 posts are surprisingly close as far as a guide to setting that pipeline up. Because they're so similar, I'm not planning to write up a guide on a similar pipeline with Fargate. For now I'll let you discover the few nuances that differ between the two launch types.