A couple months ago we decided to move Veryfi’s Python-based web app onto Microsoft Azure. The process was complicated and involved several stages. First I had to Dockerize the app, then move it into a Docker Swarm setup, and finally set up a CI/CD pipeline using Jenkins and BitBucket. Most of this was new to me, so the learning curve was steep. I had limited experience with Python and knew of Docker and Jenkins, but had yet to dive into the deep end. After completing the task, I thought I could share my research and process with the Veryfi community.
I’ve compiled a three-part series that will cover these topics:
- Dockerizing a web app, using Docker Compose for orchestrating multi-container infrastructure
- Deploying to Docker Swarm on Microsoft Azure
- CI/CD using BitBucket, Jenkins, Azure Container Registry
This is the second post in the series, where I'll discuss the process of setting up a Docker Swarm cluster on Microsoft Azure and deploying a Dockerized app to it.
This post assumes some basic knowledge of Docker Swarm.
In simple terms, Docker Swarm is an extension of Docker Compose. They both orchestrate a group of containers, with the main difference being that Swarm does this across multiple nodes and allows for replication of containers across multiple nodes for redundancy. Swarm uses two types of nodes: Master (aka manager) and Agent (aka worker). Master nodes perform all the orchestration and scheduling, while Agent nodes run the containers. Swarm handles all the load balancing between replicas. This is a very oversimplified and limited description of Swarm, so if you're new to the platform, you can dive a little deeper with Docker's official documentation: https://docs.docker.com/engine/swarm/
So why did we decide to implement Docker at Veryfi?
The main benefits to us have been portability and the ease of scale and orchestration. We use Macs internally and deploy to Linux servers on Azure and AWS and wanted to ensure we don’t run into the “well it worked on my machine…” scenario. It had to be easy to port to whatever infrastructure we wanted to use. We wanted to be able to scale easily — both Azure and AWS have container services that make this easy with Docker. Simply put, we wanted to make it all easy. And as I’ll explain in the third post in this series, we made things super easy by implementing CI/CD.
Note: the code for the example included in this article can be found in this GitHub repo: https://github.com/abakonski/docker-swarm-flask
The example here is the same minimal, "Hello World" app that I used in the first post, extended to work on Docker Swarm.
Creating a Docker Swarm cluster on Azure
The first thing I tried when setting up a Swarm cluster on Azure was to launch an Azure Container Service using the Azure Portal. After running through the wizard, the resulting resources were confusing and I was having a hard time deploying our web app to it, so I contacted the Azure support team who kindly pointed me to this very useful Azure Container Service Engine (ACS-Engine) walkthrough. This walkthrough outlines the entire process of setting the right tools and deploying a Docker Swarm cluster on Azure, so I won't rehash it in this post.
In a nutshell, you'll need to:
- Install ACS-Engine
- Generate an SSH key to connect to the Docker Swarm via SSH
- Create a cluster definition template file
- Generate Azure Resource Manager templates using ACS-Engine
- Install Azure CLI 2.0
- Create Azure Resource Group for the Docker Swarm
- Deploy Docker Swarm using Azure CLI 2.0
Connecting to Docker Swarm cluster
Now that Docker Swarm is running on Azure, it's time to explore.
Here are some things we'll need before we get started:
- SSH Key
- Linux admin username
- Master FQDN
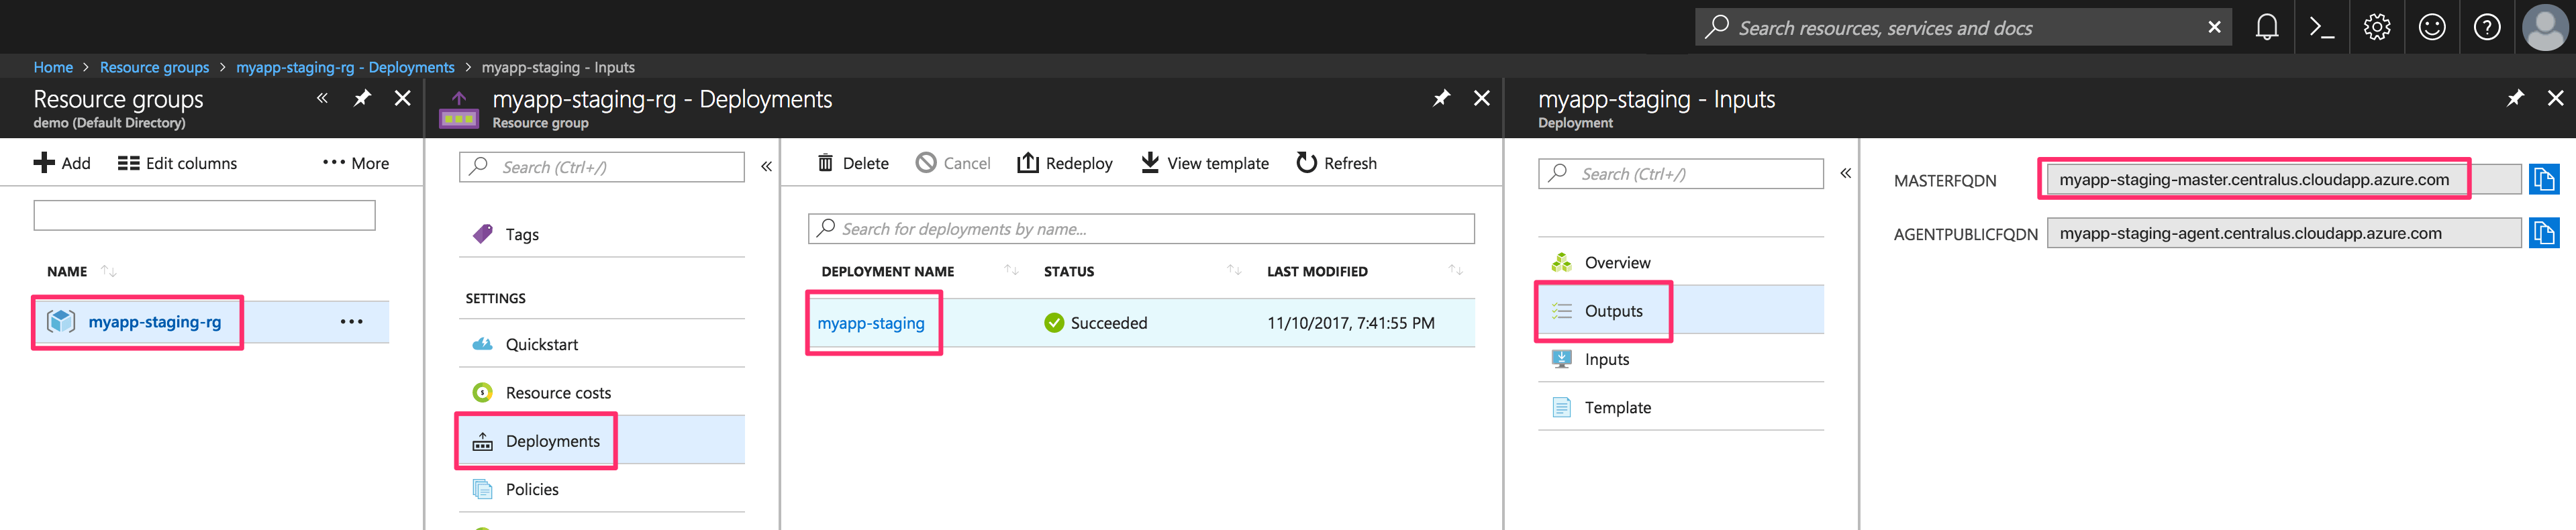
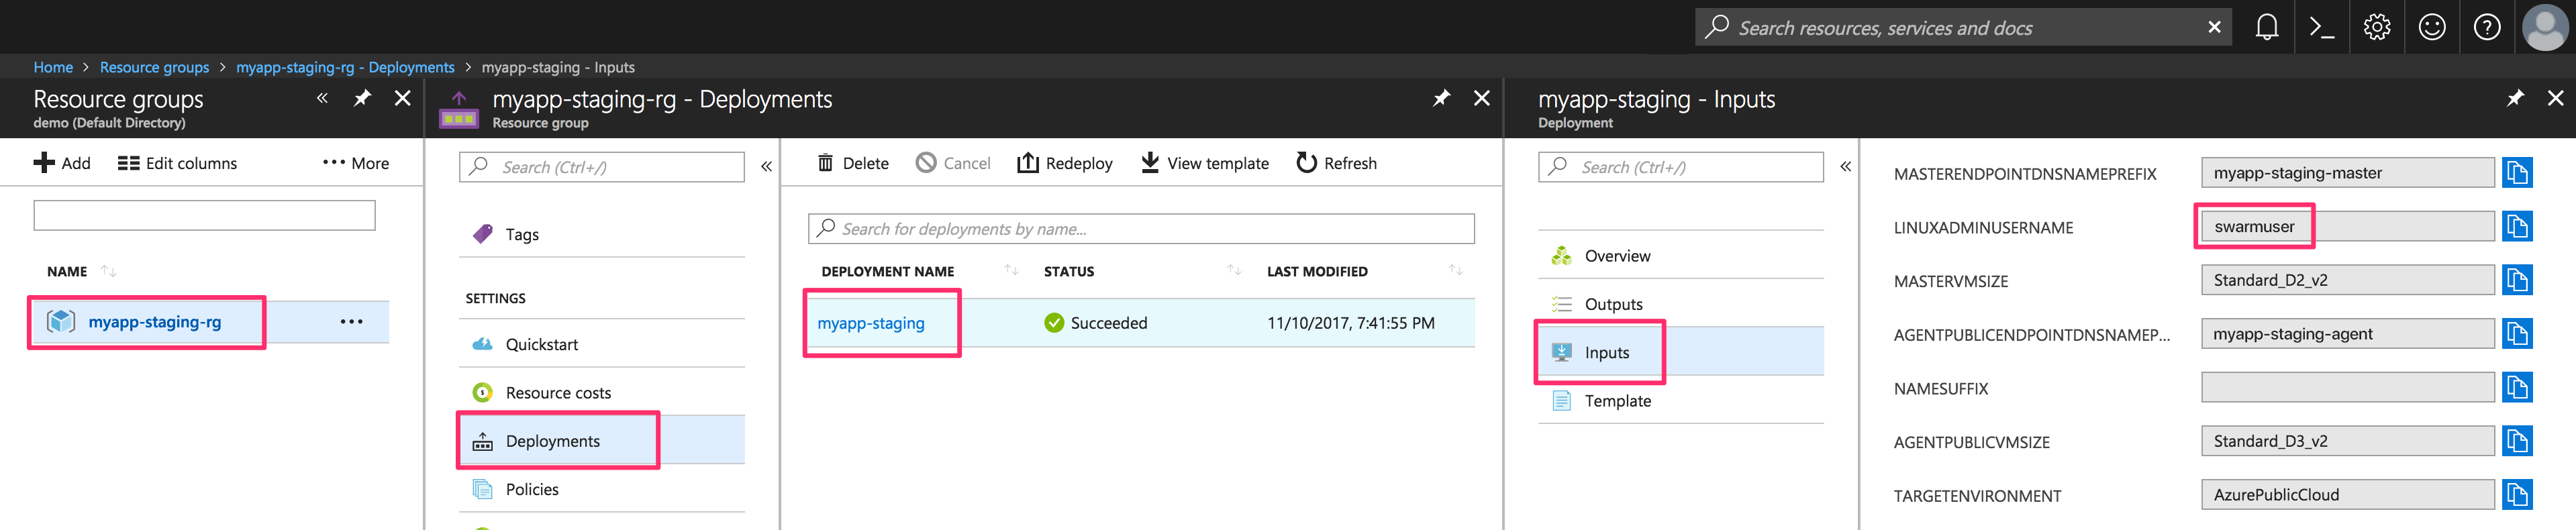
The SSH Key required to connect to the Swarm cluster is the same one used to create the cluster with ACS-Engine. The admin username and Master FQDN can both be found in Azure Portal by navigating to the cluster's Deployment details screen as per these screenshots:
Now SSH into the default Swarm Master node:
# Add SSH key to keychain to allow SSH from Swarm Master to Swarm Agent nodes
$ ssh-add -K <PATH_TO_PRIVATE_KEY>

# SSH to Swarm cluster
# Use agent forwarding (-A flag) to allow SSH connections to Agent nodes
$ ssh -p 22 -A -i <PATH_TO_PRIVATE_KEY> <LINUX_ADMIN_USERNAME>@<MASTER_FQDN>
Here are a few commands to start exploring your new Docker Swarm cluster:
# Docker version information
$ docker version

# Overview details about the current Docker machine and Docker Swarm
$ docker info

# List of the Master and Agent nodes running in the Swarm
$ docker node ls

# List of deployments running on the Swarm
$ docker stack ls

# List of services running on the Swarm
$ docker service ls
The command list above introduces the "docker stack" family of commands. A Docker Stack is essentially a group of services that run in an environment, in this case the Docker Swarm. The "docker stack" commands relate to operations that are performed across all the nodes within the Swarm, much like "docker-compose" does on a single Docker Machine.
Getting Swarm-ready with Docker Compose
In the first post in this series I introduced Docker Compose as a way of orchestrating containers and any additional required resources. Thankfully, the move from Docker Compose to Docker Swarm is trivial. Docker Swarm uses virtually identical docker-compose.yml files to Docker Compose, albeit with additional optional settings.
Here's the same docker-compose.yml file that I used in the first post, adapted for Docker Swarm:
version: '3'

services:
  redis:
      image: redis:alpine
      deploy:
          mode: replicated
          replicas: 1
          restart_policy:
              condition: on-failure
      ports:
          - "6379:6379"
      networks:
          - mynet

  web:
      build: .
      image: 127.0.0.1:5000/myapp:latest
      deploy:
          mode: global
          restart_policy:
              condition: on-failure
      depends_on:
          - redis
      ports:
          - "80:80"
      networks:
          - mynet

networks:
  mynet:
There are 3 differences in this new file:
- "deploy" setting in redis block - this tells Swarm to only create one instance of the redis container and restart the container if it enters an error state
- "deploy" setting in web block - this tells Swarm to put an instance of the web image on each agent node and restart any container if it enters an error state
- The image tag on the web has been prefixed with "127.0.0.1:5000"
We will be using a private Docker registry in our Swarm cluster to allow Docker to access our custom images when deploying to each agent node. This address and port is where we'll be running the private Docker registry.
Deploying a web app to Docker Swarm (the wrong way)
There are a two ways of manually deploying containers to Docker Swarm. One way is to SSH into a master node's host VM, pull the appropriate repository, build the Docker containers and deploy the stack. This is NOT the recommended way of doing things, but I'll introduce it here for illustration purposes, and also because I feel like this intermediate step builds some familiarity with Docker Swarm. This approach also doesn't require an external Docker Registry (like Docker Hub, Azure Container Registry or Amazon Container Registry). Instead, a private registry will be created in the Swarm.
This example uses my sample project, which can be found here. These commands are executed on a manager node's host VM, in the SSH session you opened earlier:
# Pull web app code from GitHub
$ git clone https://github.com/abakonski/docker-swarm-flask.git

# Launch private Docker registry service on the Swarm
$ docker service create --name registry --publish 5000:5000 registry:latest

# Build custom Docker images
$ cd docker-swarm-flask
$ docker-compose build

# Push web image to private registry
$ docker push 127.0.0.1:5000/myapp:latest

# Deploy images to the Swarm
$ docker stack deploy --compose-file docker-compose.yml myapp

# List stack deployments
$ docker stack ls

# Show stack deployment details
$ docker stack ps myapp
The final command above (i.e. "docker stack ps <STACK_NAME>") prints information about the containers that are running and the nodes they're running on, along with a few other pieces of information that are useful for monitoring and diagnosing problems with the stack. Since we're using agent forwarding to pass the SSH key into our connection to the Swarm Master node, connecting to any other node in the Swarm is as simple as running:
# Connect to another node inside the Swarm cluster
$ ssh -p 22 <NODE_NAME>

# This will typically look something like this
$ ssh -p 22 swarmm-agentpublic-12345678000001
Once connected to a specific (Agent) node, we can inspect containers directly:
# List containers running on the node
$ docker ps

# View all sorts of resource and configuration info about a container
$ docker inspect <CONTAINER_ID>

# View the logs of a container
$ docker logs <CONTAINER_ID>

# Connect to a container's interactive terminal (if bash is running in the container)
$ docker exec -it <CONTAINER_ID> bash

# If bash isn't available in a specific container, sh usually will be
$ docker exec -it <CONTAINER_ID> sh

# Get a list of other useful commands
$ docker --help
Manually deploying a web app to Docker Swarm (the right way)
The second — and strongly recommended — manual approach is to tunnel Docker commands on your local machine to the Docker Swarm manager node. In this example, we'll be doing just that and you'll notice that the majority of the process will be identical to the above technique. The only difference is that you're now running all your commands locally. All your file system commands are run on your local machine and only Docker commands are forwarded to the remote cluster.
As you'll find out in more depth in the third article in this series, there is another step that we can take to add some more robustness to the whole process. In the Continuous Deployment flow, we'll be building all the required images outside of the Docker Swarm (i.e. on the Jenkins build server), pushing them to a Docker Registry and finally we'll be pulling the images from the Registry and deploying them to the Swarm. That last step will be done by tunneling from the build server to the remote Docker Swarm manager, much in the same way as we'll do here.
These commands are all executed on your local machine:
# Pull web app code from GitHub
$ git clone https://github.com/abakonski/docker-swarm-flask.git

# Open SSH tunnel to Docker Swarm manager node
# Traffic on local port 2380 will be directed to manager node VM's port 2375 (Docker service)
$ ssh -fNL 2380:localhost:2375 -i <PATH_TO_PRIVATE_KEY> <LINUX_ADMIN_USERNAME>@<MASTER_FQDN>

# Tell Docker service on local machine to send all commands to port 2380 (i.e. run on Swarm manager node)
$ export DOCKER_HOST=':2380'

# Confirm that environment variable DOCKER_HOST is correctly set to ":2380"
$ echo $DOCKER_HOST

# Confirm that Docker commands are running on remote Swarm manager node - review the response here
$ docker info

# Launch private Docker registry service on the Swarm
$ docker service create --name registry --publish 5000:5000 registry:latest

# Build custom Docker images
$ cd docker-swarm-flask
$ docker-compose build

# Push web image to private registry
$ docker push 127.0.0.1:5000/myapp:latest

# Deploy images to the Swarm
$ docker stack deploy --compose-file docker-compose.yml myapp

# List stack deployments
$ docker stack ls

# Show stack deployment details
$ docker stack ps myapp

# Unset DOCKER_HOST environment variable
$ unset DOCKER_HOST

# Find the open SSH tunnel in your process list - the process ID is in the 1st column
$ ps ax | grep ssh

# End the SSH tunnel session using the above process ID
$ kill <SSH_PROCESS_ID>
This method allows for running all the same Docker commands as the first method, so feel free to do some testing and exploration. The difference here is that you can no longer SSH directly into the agent nodes, as you're working in the context of your local machine instead of being connected to the host VM of the Swarm manager node.
TIP: If you find the above process of ending the SSH tunnel session dirty, another way to do this is to open the tunnel without the “f” argument. This will keep the session in the foreground. When you’re finished with the session, simply hit CONTROL+C on your keyboard to end the session. Running the tunnel in the foreground will obviously require all other commands to be run in a separate terminal window/tab.
Testing the deployment
The example in this post runs a very simple Python app, with NginX as a web server and Redis as a session store. Now that the cluster is up and running, we can test this by browsing to the Swarm's Agent Public FQDN. The Agent Public FQDN can be found in the Azure Portal by following the same steps that we followed to get the Master FQDN above. The Agent Public FQDN should appear right underneath the Master FQDN. If everything is working correctly, entering the Agent Public FQDN into your browser's address bar should present you with a very simple page with the message "Hello There! This is your visit #<VISIT_NUMBER>".
Cleaning up the deployment
To clean up the deployment entirely, follow these steps on the Swarm Master node:
# Bring down the stack
$ docker stack rm myapp

# Completely wipe all the images from the node
$ docker image rm $(docker image ls -a -q) -f

# Stop the private registry service
$ docker service rm registry
To remove the ACS-Engine deployment entirely and free up all the resources taken up by it, open the Azure Portal, navigate to Resource Groups, open the appropriate Resource Group that you created for this exercise and finally click "Delete resource group" at the top of the Overview tab.
Final words
I mentioned earlier in the post that there are two ways of deploying to Docker Swarm. I covered the "wrong" (not recommended) approach, because I think it's helpful to get "under the hood" of Swarm to make troubleshooting easier if and when the need arises. The next post will walk through setting up a complete CI/CD pipeline with the help of Jenkins and BitBucket and this will include the "correct" way of connecting and deploying to Swarm.
Stay tuned for the next post and feel free to reach out in the comments with any feedback, questions or insights.